The plank pattern you choose changes how a room feels far more than the plank colour does. A staggered random layout makes a small bedroom feel longer. A herringbone layout makes a kitchen feel more deliberate and custom. Vinyl plank patterns are entirely a design choice driven by the layout decisions during installation, not by which product you buy at the store. After watching the same SKU of LVP installed five different ways across five different homes, here is how the patterns actually work and which one fits which space.
- The Standard Patterns Available
- Random Staggered: The Default for Good Reason
- One-Third Stagger: Uniform and Classic
- 50/50 Stagger: Use With Caution
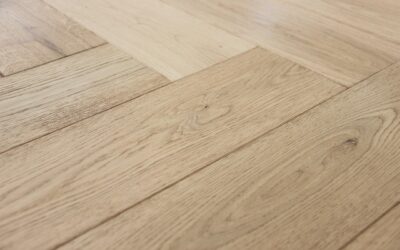
- Herringbone: Premium Visual Impact
- Chevron: The Refined Cousin
- Diagonal Layout for Small Rooms
- Matching Pattern to Plank Length
- Direction of the Run
- Acclimation Affects Every Pattern
- Choosing Your Pattern Confidently
The Standard Patterns Available
Six layout patterns dominate residential vinyl plank installations:
- Random or staggered: Most common, with seams offset 6 to 12 inches between rows
- One-third stagger: Each row offset by exactly one-third of the plank length, giving a uniform brick look
- 50/50 stagger: Each row offset by half the plank length, creating a tighter pattern that emphasizes joints
- Herringbone: Planks set at 90-degree angles creating a classic zigzag pattern
- Chevron: Similar to herringbone but with mitered ends meeting at a point
- Diagonal: Standard stagger turned 45 degrees relative to walls
The random staggered pattern accounts for roughly 80% of installations because it requires the least cutting, hides imperfect walls, and tolerates plank-length variation between cartons. The other five patterns serve specific design intentions and have different waste rates and labor costs.
Random Staggered: The Default for Good Reason
The random staggered pattern offsets each row of planks by an irregular amount, typically between 6 and 18 inches. The variation prevents the eye from picking up repeating patterns and disguises any plank-length inconsistency from manufacturing tolerances.
Best for: living rooms, bedrooms, hallways, and any room where you want the floor to recede visually and let furniture and décor take center stage. Waste rate runs around 5% to 8%. Skill level required is moderate; DIY installers handle this pattern comfortably.
One-Third Stagger: Uniform and Classic
The one-third stagger creates a regular brick-like pattern with consistent offsets between rows. Each row begins one-third of the way through the previous row’s planks, producing a measured rhythm across the floor.
Best for: kitchens, mudrooms, and any room where consistency feels appropriate. Works well with shorter plank lengths between 36 and 48 inches. Waste rate stays low at 5% to 7%. The pattern is forgiving to DIY installers and looks deliberate without being fussy.
50/50 Stagger: Use With Caution
The half-and-half offset where each row’s seam lands precisely at the midpoint of the previous row creates visible vertical lines across the floor. Manufacturers actively discourage this pattern for a structural reason: stress points concentrate along the aligned seam lines, increasing the chance of joint failure.
If you genuinely prefer the look, confine it to small spaces under 100 sq ft where the structural concern is reduced. Most installers refuse to do 50/50 stagger in main living areas because of warranty implications.
Herringbone: Premium Visual Impact
Herringbone takes square-cut planks and arranges them at 90-degree angles to each other, creating a zigzag pattern across the entire floor. The result reads as custom and premium, often raising perceived home value by $5 to $15 per sq ft on resale comparables.
The trade-off is real. Herringbone requires 15% to 25% more waste due to angled cuts, takes roughly twice as long to install, and demands square plank ends that not all LVP products provide. Labor costs run $4 to $7 per sq ft compared to $2 to $3 for standard patterns. Best for entryways, formal dining rooms, and feature kitchens where the visual investment pays off.
Chevron: The Refined Cousin
Chevron uses mitered plank ends to meet at a sharp point, distinguishing it from herringbone’s 90-degree joins. The pattern reads as more formal and more European than herringbone, though the difference can be subtle in photos.
Few LVP products come pre-mitered, so installers usually cut the angles on-site, which extends installation time and waste. Expect 25% to 35% material waste and labor costs of $5 to $8 per sq ft. Reserve chevron for spaces where the formality justifies the premium.
Diagonal Layout for Small Rooms
Setting planks at 45 degrees to the walls makes a small or oddly proportioned room feel larger because the eye travels along longer diagonal lines than the actual room dimensions. The technique works particularly well in narrow rooms where standard pattern alignment emphasizes the bowling-alley feel.
Diagonal layouts add 10% to 15% waste due to angled cuts at walls and require precise starting-line measurement. The pattern is unforgiving of mistakes because every plank cut depends on the first row’s exact angle. Most DIY installers should hire this one out.
Matching Pattern to Plank Length
Plank length influences which patterns work. Longer planks of 48 to 72 inches read beautifully in random stagger and showcase the wood-look detail. Shorter planks at 36 to 48 inches suit one-third stagger and herringbone, where the consistent pattern repeats become a design feature.
Extra-long planks at 60 to 84 inches are best in random stagger only. Trying to chevron or herringbone with extra-long planks produces an overwhelming visual pattern that fights with the room’s other elements. Match the pattern complexity to the plank scale.
Direction of the Run
Pattern aside, the direction of the planks affects how the room reads. Run planks parallel to the longest wall to emphasize length. Run perpendicular to widen a narrow space. Run toward the main light source from windows to highlight the plank texture in natural light. These are not rigid rules but reliable starting points.
In open-plan homes, run planks continuously in the same direction across the kitchen, dining, and living areas to create flow. Changing direction at room transitions interrupts the eye and makes the space feel chopped up.
Acclimation Affects Every Pattern
Regardless of pattern, every LVP installation needs proper acclimation. Stack the unopened cartons flat in the installation space for 48 to 72 hours at normal home temperature. The pattern complexity does not change this requirement; herringbone and chevron actually demand stricter acclimation because the angled cuts create more cumulative seam stress.
Choosing Your Pattern Confidently
Start with the room’s purpose and traffic. High-traffic everyday spaces benefit from quiet random stagger that hides daily wear. Formal areas where guests gather reward investment in herringbone or chevron. Small or awkward rooms gain from diagonal layout. The right pattern is the one that solves a specific problem in your specific space, not the one trending on social media. Take the time to lay out a sample run in your actual room before committing the full carton.
Prefer to explore on your own?
See how new flooring looks in your actual room in seconds — free, no signup.
Try the free Floor Studio →