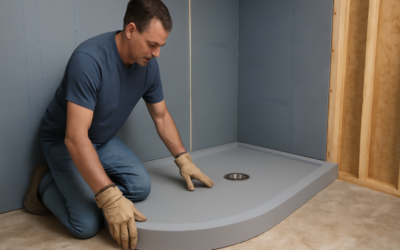
If you have ever demoed an old tile shower and found black, crumbling mortar under the floor, you already understand why the Wedi shower pan has become a favorite among remodelers and serious DIYers. Instead of a labor-intensive mud bed with a hidden rubber liner, Wedi delivers a pre-sloped, fully waterproof foam base that bonds directly to your subfloor and ties into a bonding-flange drain. The result is a shower that is waterproof the moment you finish setting it, with far less room for error. This guide covers how the system works, how to install it, what it costs, and where it shines.
Part of our Bathroom Remodeling & Flooring guide — explore the full guide →
What Exactly Is a Wedi Shower Pan?
Wedi is a German-engineered building panel system built around a core of extruded polystyrene foam sandwiched between fiberglass-reinforced cement coatings. The shower pan is a factory pre-sloped version of this material, shaped so every surface drains toward the center or offset drain at the code-required quarter-inch-per-foot slope. Because the foam core itself is waterproof, there is no separate liner buried in the assembly. The entire pan, walls, and seams become a continuous waterproof envelope once sealed with Wedi’s proprietary sealant and mesh.
This is fundamentally different from a traditional mortar-bed shower, which relies on a PVC or CPE liner hidden beneath the pan and a weep-hole drain to manage water that inevitably penetrates the tile and grout. With Wedi, water never reaches the subfloor because the barrier is at the tile-setting surface, not buried inches below it.
Why Homeowners Choose Wedi Over a Mud Bed
The appeal comes down to speed, reliability, and weight. A few reasons it wins converts:
- No cure-and-wait mortar beds. A traditional shower requires a bottom slope, liner, and top mortar bed with drying time between steps. Wedi installs and can be tiled the same day.
- Waterproof at the surface. The barrier sits directly under the tile, so mold and rot have nowhere to hide.
- Lightweight and workable. The foam pan cuts with a utility knife and weighs a fraction of a mortar bed, a real advantage on upper floors.
- Fewer failure points. Most mud-bed failures come from a nicked liner or a clogged weep hole. Wedi eliminates both.
Sizes and Drain Options
Wedi offers pans in standard footprints ranging from 32 by 32 inches up to 48 by 72 inches, with both center and offset drain placements. There are square, rectangular, and neo-angle corner shapes to match common shower footprints. Center-drain pans suit square showers, while offset or linear-compatible pans work better for long rectangular enclosures and barrier-free curbless designs. If your shower has an odd footprint, Wedi’s Fundo Riolito line accommodates a linear drain along one edge, which many designers prefer for a modern, single-slope look and large-format tile.
Tools and Materials for Installation
Gather your supplies before demo day. You will need the Wedi pan sized to your opening, the matching bonding-flange drain assembly, Wedi sealant (typically the 610 tube), Wedi joint sealant tape or mesh for seams, unmodified thinset mortar (Wedi specifies unmodified because the foam is non-porous), a notched trowel, a utility knife, a margin trowel, and a caulk gun. A cordless drill, level, and tape measure round out the kit. Always confirm the current manufacturer instructions, since using the wrong sealant or a modified thinset where unmodified is specified can void the warranty.
Step-by-Step Installation Overview
While every job differs, the sequence follows a consistent pattern:
- Dry-fit the pan. Set it in the opening and mark the drain location. The subfloor must be clean, structurally sound, and flat.
- Install the drain plumbing. Connect the Wedi bonding-flange drain to your waste line, dry-fitting to confirm height so the pan sits flush with the surrounding subfloor.
- Bed the pan in thinset. Trowel a full coat of unmodified thinset onto the subfloor, then press the pan into it, seating it fully with no voids underneath. Voids can lead to cracked tile later.
- Seal the drain connection. Apply Wedi sealant around the drain-to-pan joint per the instructions.
- Seal all seams. Where the pan meets the walls, apply a continuous bead of Wedi sealant and embed the reinforcing joint tape, creating a watertight transition up onto your Wedi or backer-board walls.
- Flood test. Though not strictly required, a 24-hour flood test gives peace of mind before tiling.
- Tile. Once seams are sealed, set tile directly on the pan with thinset. No additional membrane is needed.
What a Wedi Shower Pan Costs
The pan itself typically runs $250 to $600 depending on size and drain configuration, with the bonding-flange drain kit adding $80 to $150. Sealant, tape, and thinset add another $60 to $120. All in, materials for a standard shower base land around $400 to $800. That is more than the raw materials for a mud bed, which might cost $150 in mortar and liner. The trade-off is labor: Wedi can shave hours off the build and dramatically reduce the skill required, which is why pros who charge for time often come out ahead. A professional-installed Wedi base within a full shower remodel usually falls within a $1,200 to $2,500 range for the base and waterproofing portion.
Wedi Versus Other Foam Pan Systems
Wedi is not the only foam-based waterproofing system on the market, and understanding how it compares helps you choose confidently. Schluter’s Kerdi system, for instance, uses a foam pan too but relies on a sheet membrane bonded over the substrate rather than Wedi’s integral cement-coated foam. Both are excellent, proven systems, and both waterproof at the tile-setting surface. The main practical differences come down to how the seams are sealed and which sealants and drains each requires. Wedi’s approach, with its proprietary sealant creating a bonded, gasketed joint, appeals to installers who want a robust, forgiving seal, while Kerdi’s thin membrane keeps the assembly slightly lower in profile. Laticrete’s Hydro Ban and USG’s Durock also offer foam pan and board options. The critical takeaway is to stay within one manufacturer’s system and follow its specific instructions, since mixing a Wedi pan with a competitor’s membrane or drain can void warranties and create seams that were never engineered to work together.
Another consideration is the walls. Wedi shines brightest when you pair the pan with matching Wedi building panels on the walls, because the pan-to-wall seams then use the same sealant and reinforcing tape, creating one continuous waterproof envelope from the floor up. If you are tiling over cement backer board on the walls instead, you will need a compatible liquid or sheet membrane on the walls and must carefully detail the transition where those walls meet the Wedi pan. This is a common leak point when systems are mixed, so plan the wall waterproofing at the same time you choose the pan rather than treating it as an afterthought.
Common Mistakes to Avoid
- Using modified thinset where unmodified is required. Modified thinset traps moisture against the non-porous foam and cures slowly. Follow the spec.
- Leaving voids under the pan. Insufficient thinset coverage lets the foam flex, cracking tile and grout. Achieve full contact.
- Skimping on seam sealant. The waterproofing is only as good as your weakest seam. Every corner and drain joint must be continuously sealed and reinforced.
- Mixing incompatible brands. Do not substitute a random silicone for Wedi sealant at the critical waterproofing joints; the system is engineered to work together.
- Ignoring subfloor flatness. A wavy or bouncy subfloor undermines even the best pan. Shore up deflection and flatten before setting.
Is Wedi Right for Your Project?
For most homeowners building or remodeling a tile shower, a Wedi shower pan hits the sweet spot of reliability and buildability. It is especially compelling on second floors where weight matters, in curbless barrier-free designs, and for anyone nervous about the buried-liner guesswork of a traditional mud bed. Purists and budget-focused pros may still favor a hot-mopped or mortar-bed shower, and it remains a proven method in skilled hands. But if you want a waterproof base you can trust the day you finish it, without decades of hidden moisture risk, Wedi earns its place. Pair it with matching Wedi wall panels for a fully integrated waterproof enclosure, and you have a shower engineered to outlast the tile on its surface.