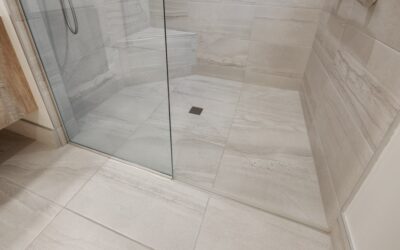
For the first decade of my tile career, every shower floor started with a wheelbarrow of sand, a bag of Portland cement, and a morning of screeding a sloped mud bed by hand. These days, more than half the showers I build start with a tile shower base kit instead — a factory-made, pre-sloped pan of dense foam or composite that arrives with the correct pitch already built in. You set it in a bed of thinset, connect the drain, waterproof the seams, and tile directly over it. The kit costs more than sand and cement. It also removes the single hardest skill in shower building, which is why I recommend it to almost every DIYer who asks.
Part of our Bathroom Remodeling & Flooring guide — explore the full guide →
What a Ready-to-Tile Base Kit Actually Is
A ready-to-tile kit is not an acrylic shower pan. Acrylic and fiberglass pans are the finished floor — you step directly on them and no tile is involved. A tile shower base kit is a structural substrate: a rigid panel of expanded polystyrene foam (or a composite like cultured stone or PVC-composite in some brands), molded with a continuous quarter-inch-per-foot slope toward an integrated drain location. The top surface is either factory-waterproofed or gets a membrane during install, and then you bond mosaic tile straight to it.
A typical kit box includes the pre-sloped pan, a drain assembly with a bonding flange, waterproof banding or sealant for the perimeter, and instructions. Fuller “complete kits” add wall boards, a preformed curb, niche boxes, corners, and screws — everything except tile and thinset.
Kit vs. Traditional Mud Bed: The Honest Comparison
| Factor | Foam base kit | Traditional mud bed |
|---|---|---|
| Materials cost (36×60) | $400–$900 | $120–$200 |
| Skill required | Low–moderate | High |
| Install time | 2–4 hours | Full day + cure |
| Slope accuracy | Perfect from factory | Only as good as your screed work |
| Custom sizes | Cut down or order custom | Any size, any drain location |
| Weight | 10–25 lbs | 300+ lbs of mortar |
The mud bed still wins on raw material cost and total flexibility — a weird 39×63 shower with an off-center drain is trivial in mud and awkward in foam. But a mud bed done wrong (flat spots, low perimeter, slope away from the drain) is a shower that ponds water forever, and I’ve torn out plenty of amateur beds. The kit’s pitch is machined. You cannot screw it up in the way that matters most.
The Major Systems on the US Market
Schluter Kerdi-Shower kits
The one your tile store definitely stocks. Expanded polystyrene tray in sizes from 32×32 up to 72×72, designed to pair with Kerdi membrane over the walls and floor, and the Kerdi-Drain with its bonding flange. A 48×48 tray runs about $300 to $380; the full kit with drain, curb, and membrane lands around $600 to $800. Trays are center-drain or off-set-drain, and you can trim up to a few inches per side. Documentation and video support are the best in the business, which matters when it’s your first shower.
Wedi Fundo
Wedi panels are blue extruded foam with factory cement-resin skins, and the Fundo Primo/Riolito trays are arguably the most contractor-favored system for speed. The waterproofing is the sealant at the joints — no separate membrane layer — so a Wedi pan is watertight the moment the sealant skins over. Expect $450 to $700 for a tray and $900-plus for a full kit. The linear-drain Riolito versions are the clean way to get a curbless, single-slope floor for large-format tile.
KBRS ShowerSlope and Tile-Basin
KBRS builds composite trays that are notably harder-surfaced than EPS foam, sells true custom sizes and drain placements made to order, and offers their Tile-Basin with waterproofing already integrated. A custom size costs $500 to $900 and takes a week or two to ship, but “any dimension, any drain location” solves the exact problem that pushes people back to mud beds.
Laticrete Hydro Ban, Tile Redi, and the budget tier
Laticrete’s Hydro Ban pans pair with their liquid or sheet membranes and price similarly to Schluter. Tile Redi pans are one-piece leak-tested polyurethane with the drain already integrated — heavier and pricier ($500 to $1,100) but genuinely idiot-proof on waterproofing. Below all of these sit the Amazon-brand EPS trays at $150 to $300; some are fine, but check the density spec and reviews, because a soft tray that dents under a knee before tiling is not a bargain.
Installing a Base Kit: The Short Version
- Dry-fit and check the subfloor. The floor must be flat and solid — foam trays telegraph dips. Fix squeaks and level humps first. Rough in the drain to match the tray’s drain location exactly.
- Bed the tray in thinset. Trowel modified thinset over the whole footprint (most brands specify a 1/4-inch notch), set the tray, and walk it in evenly. Full contact matters; hollow spots crack tile later.
- Connect the drain. Bonding-flange drains glue to the 2-inch trap riser, then the membrane or flange collar seals to the tray. This step replaces the old clamping-drain-and-liner dance entirely.
- Waterproof the perimeter. Band every tray-to-wall joint with the system’s sheet band or sealant. This is where kits leak when they leak — the tray itself never fails, the transitions do. Use the same brand’s parts; mixing systems voids everyone’s warranty.
- Flood test. Plug the drain, fill to just below the curb, mark the level, wait 24 hours. Fifteen dollars of test plug versus a ceiling repair downstairs — always test.
- Tile. Two-inch or smaller mosaic conforms to the slope on standard trays. Linear-drain single-plane trays accept large format. Unmodified thinset over Kerdi-style membranes, modified over Wedi and most composites — follow the sheet.
A first-timer can realistically go from bare subfloor to flood test in a weekend morning. The same milestone in mud takes me — a professional — most of a day, plus cure time before I can even test.
Curbed, Curbless, and Linear-Drain Options
Most kits ship with a foam curb you thinset down and tile — simple and code-friendly. Curbless entries are where kits genuinely shine: brands sell recessed trays (Wedi Fundo Ligno is 3/4-inch thick) that sit flush in the joist bay or over a lowered subfloor so the bathroom floor flows straight into the shower. Doing curbless in mud means recessing framing and hand-floating a perfect transition; doing it with a Ligno-style tray means dropping the subfloor and setting a panel. If you’re building for aging-in-place — and half my clients over 55 now ask — a curbless kit with a linear drain at the back wall is the cleanest path, typically adding $400 to $700 over a standard curbed kit.
What a Kit Shower Really Costs
For a 48×36 alcove: tray and drain $350 to $600, wall waterproofing (membrane or foam board) $250 to $450, curb and niche $80 to $150, thinset and sealants $100. Call it $800 to $1,300 for a fully waterproofed shell before tile — versus maybe $450 doing mud and liquid membrane yourself. If a contractor is installing, though, the math flips: the kit saves four to six labor hours, which at $75 to $110 an hour largely pays for itself. That’s why pros adopted these systems even though the boxes cost more.
The Mistakes That Void the Magic
Foam trays are forgiving, but the failures I’ve been called to autopsy share a familiar list. Skipping the thinset bed under the tray — or troweling a few dabs instead of full coverage — leaves voids that crack floor tile under a heel within months; the tray must be fully supported, period. Mixing brands is the second classic: a Schluter tray with an off-brand drain and somebody else’s banding turns three warranties into zero, and the interfaces between systems are exactly where seepage starts. Third is trimming a tray past its allowance or notching it around framing without resealing the cut — the foam core is not waterproof once the skin or membrane plane is broken. Fourth, tiling the tray with big tile: a standard pre-sloped tray has four subtle slope planes, and anything much over 4 inches spans the creases and rocks; save the 12×24 floor tile for a linear-drain single-plane tray designed for it. And fifth, skipping the flood test to save a day. Every one of these is avoidable with the instruction sheet and an unhurried Saturday, which is precisely the audience these kits were built for.
My bottom line after a couple hundred of both: if you’ve floated mud beds for years, keep doing whatever you like. If this is your first or third shower, buy a tile shower base kit from one of the major systems, stay inside that one brand for every component from drain to banding, and spend the skill points you saved on clean tile work. The pre-sloped pan turned the hardest part of shower building into the easiest, and there is no prize for mixing sand the hard way.
Prefer to explore on your own?
See how new flooring looks in your actual room in seconds — free, no signup.
Try the free Floor Studio →