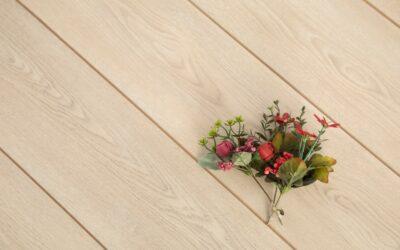
White washed wood flooring delivers that airy, coastal, Scandinavian-inspired look that makes rooms feel bigger, brighter, and effortlessly relaxed. The technique layers a diluted white pigment over natural wood so the grain still shows through, giving you a soft, weathered pale finish rather than a solid painted surface. Done well, it reads as sun-bleached driftwood, and it has stayed on-trend for years because it flatters almost any interior.
There are a few different ways to achieve the effect, from buying prefinished planks to whitewashing a floor you already own. Here is how each approach works, what it costs, and how to shop for it.
What White Washing Actually Does
White washing lightens wood while letting the natural grain and texture remain visible. Traditional whitewash was a thinned lime or white paint wiped onto the surface and partly wiped back off, leaving pigment in the grain and pores. Modern versions use white-tinted stains, hardwax oils, or diluted water-based finishes to achieve a similar translucent effect with better durability.
The result is a floor that looks pale and softly weathered but still clearly wood, not painted. Oak is the most popular species for the technique because its open, prominent grain catches and holds the white pigment beautifully, creating that characteristic limed look.
It helps to know the difference between a few related finishes that get lumped together. A true whitewash leaves visible white pigment sitting in the grain. Pickling is essentially the same idea using a white or pastel-tinted stain. Liming, an old European technique, rubs white liming wax into open-grained wood so the pores glow pale against a slightly darker surface. A bleached floor, by contrast, uses a two-part chemical bleach to strip the wood’s natural color rather than adding pigment. All four land in a similar bright, pale territory, but they get there differently and wear differently over time.
Ways to Get the White Washed Look
You have three practical routes, depending on your budget and whether you are starting fresh or working with an existing floor.
1. Buy Prefinished White Washed Planks
The easiest path is buying flooring already finished in a white-washed or limed tone at the factory. You get consistent color, a durable aluminum-oxide or hardwax finish, and no messy site work. Engineered white-oak planks in a whitewash finish are widely available and install over concrete or radiant heat.
2. Whitewash a Raw or Sanded Floor
For a custom look, you can whitewash on site. The basic process on bare or freshly sanded wood looks like this:
- Sand the floor to bare wood, finishing with 100 to 120-grit paper, then vacuum thoroughly.
- Optionally apply a wood conditioner on tight-grained species to prevent blotching.
- Wipe on a white-tinted stain or a mix of white paint thinned with water, working with the grain in small sections.
- Wipe back the excess with a clean rag until you reach the desired opacity, leaving pigment in the grain.
- Let it dry fully, then seal with two to three coats of a non-yellowing water-based polyurethane.
3. Use a White Hardwax Oil
White-pigmented hardwax oils, popular in European floors, penetrate and finish in one product. They produce a natural matte look and are easy to spot-repair, though they require periodic re-oiling.
Choose the Right Sealer
The single biggest mistake in white washing is using the wrong topcoat. Standard oil-based polyurethane carries a warm amber tint that will turn your crisp white finish yellow and muddy within months. Always seal a white washed floor with a water-based, non-yellowing polyurethane or a clear hardwax oil formulated to stay clear. This keeps the finish looking bright and true rather than sliding toward beige.
Plan on two to three thin topcoats, sanding lightly with 220-grit between coats, for a floor that resists traffic without dulling the pale effect.
Best Wood Species for White Washing
Grain openness drives how well a species takes whitewash. A few work far better than others.
- White oak and red oak. The most popular choice. Open, prominent grain holds pigment beautifully for that limed look.
- Ash. Similar bold grain to oak, takes whitewash cleanly, and is quite hard.
- Pine. Common in farmhouse and cottage settings, though its softness means more denting.
- Maple. Possible but tricky. Its tight, closed grain absorbs pigment unevenly and can blotch, so a conditioner is essential.
Adjusting the Opacity and Tone
One of the best things about white washing is how much control you have over the final look. The more pigment you leave on the surface and the less you wipe back, the more opaque and painterly the floor becomes. Wipe back aggressively and you get a barely-there, sun-bleached whisper of white that still reads mostly as natural wood.
Test your mix on a scrap board or an inconspicuous corner before committing to the whole floor. A common starting ratio for a DIY whitewash is one part white paint to one part water, adjusted from there. For a softer, greige result rather than a stark white, add a touch of gray tint. On new white oak you can also skip pigment entirely and use a clear hardwax oil that simply blocks the wood’s natural ambering, keeping it pale and neutral. The point is that whitewash is a spectrum, not a single color, so dial it to your room.
Common Mistakes to Avoid
A few predictable errors trip up first-timers, and each is easy to sidestep once you know it is coming.
- Sealing with an oil-based polyurethane, which ambers the white into a dingy beige within months.
- Choosing a tight-grained species like maple without a conditioner, which causes blotchy, uneven absorption.
- Applying the whitewash too thick and letting it dry before wiping back, which leaves a chalky, painted look instead of a translucent one.
- Skipping a test section and discovering the color reads too cool or too stark across an entire floor.
- Under-sealing high-traffic areas, so the pigment wears through in walking lanes.
Work in small sections, keep a wet edge, and always finish with enough clear topcoats to protect the pigment from foot traffic.
What White Washed Flooring Costs
Cost depends heavily on whether you buy prefinished or do the work on site.
- Prefinished white washed engineered planks: $5 to $12 per square foot for material
- Professional installation: $3 to $6 per square foot
- Site whitewashing an existing floor: $3 to $7 per square foot for sand, stain, and seal labor
- DIY materials only: roughly $1.50 to $3 per square foot for stain, sealer, and supplies
A 300-square-foot room finished with prefinished planks typically runs $2,400 to $5,400 installed, while whitewashing an existing hardwood floor professionally lands around $900 to $2,100 depending on condition.
Care and Maintenance Tips
White washed floors show dust and debris less than dark floors, which is a quiet everyday advantage. Sweep or dust-mop regularly, and clean with a pH-neutral hardwood cleaner rather than anything harsh that could break down the finish. Felt pads under furniture and walk-off mats at entries protect the surface from grit.
Because the finish is pale, sun fading is less dramatic than on dark woods, but rotating rugs occasionally still helps the floor age evenly. If you used a hardwax oil, plan to refresh high-traffic lanes with a fresh coat every few years to keep the protection intact.
Is White Washed Flooring Right for You?
White washed wood flooring is a superb choice if you want to brighten a space, lean into coastal, farmhouse, or Scandinavian style, and keep a floor that hides dust well. Prefinished planks give the most reliable, durable result with the least effort, while site whitewashing lets you customize an existing floor’s exact tone. Whichever route you choose, insist on a non-yellowing water-based sealer, pick an open-grained species like oak, and you will end up with a bright, timeless floor that keeps rooms feeling light for years.
Prefer to explore on your own?
See how new flooring looks in your actual room in seconds — free, no signup.
Try the free Floor Studio →