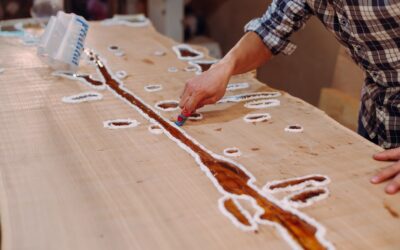
That stunning river table with the glowing blue channel running through live-edge slabs? It is made possible by one versatile material. Wood epoxy resin is a two-part liquid plastic that cures into a clear, glass-hard solid, letting you fill voids, embed objects, seal surfaces, and join wood slabs into seamless works of art. Beyond the showpiece tables flooding social media, this material quietly handles practical repairs like filling cracks, stabilizing knots, and creating durable, waterproof finishes. Here is how to work with it successfully.
Part of our Epoxy, Concrete & Garage Floors guide — explore the full guide →
- What Epoxy Resin Actually Is
- Deep Pour vs. Coating Epoxy
- Getting the Mix Ratio Right
- Banishing Bubbles
- Building a River Table Step by Step
- Coloring and Effects
- Practical Repairs Beyond Furniture
- Safety and Working Conditions
- Sanding and Finishing the Cured Resin
- Avoiding Common Failures
- Final Thoughts Before Your First Pour
What Epoxy Resin Actually Is
Epoxy is a thermosetting polymer sold as two components: a resin and a hardener. When you mix them in the correct ratio, a chemical reaction kicks off that transforms the liquid into a rigid, durable solid. This reaction generates heat, called the exotherm, which becomes important when you pour thick layers. Once cured, the result is a tough, clear, waterproof material that bonds tenaciously to wood.
Unlike a surface stain or oil finish, epoxy adds physical thickness and structure. That is what allows it to bridge gaps, encapsulate, and build up into the deep, glossy pours that define river tables and live-edge furniture.
Deep Pour vs. Coating Epoxy
Choosing the wrong type is the most common beginner mistake. The two main categories are formulated for completely different jobs.
- Deep pour (casting) epoxy: Engineered for thick, slow cures. It releases heat gradually, so you can pour layers up to one or two inches at a time without overheating. Use it for river tables, voids, and encapsulating objects.
- Coating (tabletop) epoxy: Designed for thin layers, typically an eighth of an inch or less. It cures faster and harder but generates too much heat in thick pours, where it can crack, yellow, or even smoke. Use it for sealing surfaces and final glossy topcoats.
A frequent disaster is using fast tabletop epoxy for a deep river pour. The trapped heat causes cracking and bubbling. Match the product to the depth and you avoid most problems.
Getting the Mix Ratio Right
Epoxy is unforgiving about ratios. Each product specifies an exact mix, often by volume such as 2:1 or 1:1, and deviating even slightly leaves you with a sticky, never-curing mess or a brittle finish. Always measure precisely with graduated cups rather than eyeballing it.
- Measure both parts exactly per the manufacturer’s ratio
- Combine and stir slowly for two to three minutes, scraping the sides and bottom of the container
- Transfer to a second clean cup and stir again to catch any unmixed resin clinging to the first container
- Work within the stated pot life, the window before the mixture begins to set
Banishing Bubbles
Air bubbles are the enemy of a clear, professional pour. They get introduced during mixing and escape from porous wood as it cures. To minimize them, stir gently rather than whipping in air, and warm the resin slightly to lower its viscosity so bubbles rise out more easily. After pouring, pass a heat gun or torch a few inches above the surface in quick sweeping motions. The heat pops surface bubbles instantly. Avoid lingering in one spot, which can scorch the resin.
Building a River Table Step by Step
The signature project is more approachable than it looks if you respect the process.
- Flatten and sand your live-edge slabs, then seal them with a thin coat of epoxy to lock in loose fibers and prevent bubbles during the main pour.
- Build a sturdy mold from melamine and seal the seams with silicone caulk so resin cannot leak out.
- Set your slabs in the mold, add any pigment or dye to your deep pour epoxy, and pour in layers within the depth limit.
- Let each layer cure to the manufacturer’s recoat window before adding the next.
- After full cure, remove the piece, plane or sand it flat, then finish with progressively finer grits and a final coating epoxy or oil for a flawless surface.
Coloring and Effects
Part of the appeal is the range of looks you can achieve. Transparent dyes create that signature glowing river effect, while opaque pigments and metallic powders produce solid colors and shimmering swirls. Some builders embed stones, shells, photos, or LED lighting for custom effects. A little colorant goes a long way, so add it gradually and test on a small batch first.
Practical Repairs Beyond Furniture
Resin is not just for showpieces. Around the house it handles a range of fixes.
- Filling cracks, checks, and knot holes in tabletops and slabs
- Stabilizing punky or spalted wood so it can be worked and finished
- Creating durable, waterproof bar tops and counters
- Sealing end grain to prevent moisture damage
Safety and Working Conditions
Treat epoxy with respect. Work in a well-ventilated area, wear nitrile gloves and safety glasses, and use a respirator rated for organic vapors when sanding cured resin or working with large pours. Maintain a room temperature around 70 to 75°F, since cold slows or stalls curing and excessive heat speeds the reaction unpredictably. Keep dust off the surface while it cures by covering the project with a tent or box.
Sanding and Finishing the Cured Resin
The pour is only half the work; the finish is what makes a piece look professional. Once fully cured, cured epoxy can be sanded to a flawless, glass-clear shine. Start with a coarser grit to knock down high spots and level the surface, then work up through progressively finer grits, wet-sanding the higher numbers to keep the surface cool and the dust down. Skipping grits leaves scratches that show through the final finish, so move up gradually.
After sanding, you have two paths to a final shine. You can buff the surface with a polishing compound for a high-gloss, glass-like clarity, or apply a thin flood coat of coating epoxy to self-level into a perfectly smooth top. Many builders prefer the flood coat for tabletops because it restores full clarity without hours of polishing. For a softer, more natural feel, a penetrating oil or hardwax finish over the wood portions ties the piece together.
Avoiding Common Failures
Most epoxy disasters trace back to a handful of repeat mistakes. Knowing them in advance saves a ruined project.
- Pouring too deep: Exceeding the depth limit traps heat, causing cracks, bubbles, and yellowing
- Bad ratio: Eyeballing the mix leaves sticky, uncured patches or a brittle finish
- Cold conditions: Low temperatures stall the cure and trap bubbles
- Contaminated surface: Dust, oil, or wax causes fish-eyes and poor adhesion
- Leaky mold: Unsealed seams let resin escape and waste expensive material
Final Thoughts Before Your First Pour
The learning curve with epoxy resin is real but short. Start with a small project like filling a knot or coating a cutting board before attempting a full river table. Buy the right type for your pour depth, measure your ratios exactly, manage bubbles with heat, and give the material the cure time it needs. Get those fundamentals down, and this material opens the door to durable repairs and genuinely stunning custom pieces you simply cannot make any other way.