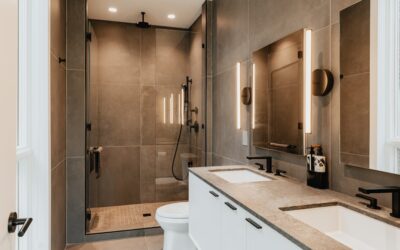
The single most common reason bathroom renovations fail is not ugly tile, it is water getting behind the tile. A bathroom tile remodel is as much about the waterproofing you cannot see as the finish you can, and skipping that hidden layer leads to rot, mold, and a teardown a few years later. This guide walks through tile selection, the critical waterproofing steps, smart layout decisions, and realistic costs so your new bathroom looks great and stays watertight for decades.
Part of our Bathroom Remodeling & Flooring guide — explore the full guide →
- Choosing the Right Tile
- Waterproofing Is Not Optional
- Layout and Design Decisions
- Grout and Sealing
- What It Costs
- DIY vs Hiring a Pro
- Subfloor and Substrate Prep
- Choosing a Color and Style That Lasts
- Timeline and What to Expect
- Maintenance to Protect Your Investment
- Accessibility and Future-Proofing
- The Bottom Line
Choosing the Right Tile
Bathrooms are wet, so material and slip resistance matter more than looks. Porcelain is the workhorse: dense, low-absorption, and rated for both floors and walls. Ceramic is fine for walls and lighter-use floors. Natural stone like marble is stunning but porous and needs regular sealing. For floors, check the slip rating; a textured or honed finish or a smaller tile with more grout lines gives better traction underfoot.
- Floor tile: porcelain with a slip-resistant finish, PEI 3 or higher
- Shower walls: porcelain or ceramic, easy-clean glazed surface
- Shower floor: small mosaic tile for grip and to follow the slope to the drain
- Accents: glass or stone niche and border tiles for visual interest
Waterproofing Is Not Optional
This is the step amateurs skip and pros never do. Cement backer board alone is not waterproof; it must be paired with a waterproofing membrane. Modern systems use a liquid membrane rolled over the backer board or a sheet membrane like the orange-dimpled products that uncouple and seal in one step. Pay special attention to the shower pan, corners, and the curb, since those are where leaks start.
Layout and Design Decisions
Plan the tile layout before any thinset goes down. Large-format tile on the walls means fewer grout lines and a more modern, easier-to-clean look. A vertical stack or a classic offset changes the whole feel of the room. Decide on a feature wall, a recessed niche for shampoo, and the transition height where wall tile stops. Dry-lay the floor first to avoid a sliver cut against the most visible wall.
Grout and Sealing
Grout is the maintenance weak point. Epoxy grout costs more and is harder to work with, but it resists stains and water far better than cement grout, making it worth the upgrade in showers. If you use cement grout, seal it after curing and reseal annually. Choose a grout color that hides soap scum in the shower while complementing the tile elsewhere.
What It Costs
A modest bathroom tile remodel runs $3,000 to $7,000, while a full gut renovation with new shower, floor, and wall tile commonly lands between $10,000 and $25,000. Tile material is $1 to $15 per square foot, and professional installation is $7 to $14 per square foot, more for intricate patterns and waterproofing. Budget 15 percent extra tile for cuts and future repairs from the same lot.
DIY vs Hiring a Pro
A handy homeowner can tackle a floor or a simple wall, but the shower is where stakes are highest. Improper waterproofing or a bad pan slope causes leaks that destroy the room. If you do hire out, choose the shower waterproofing and pan work at minimum. Ask to see the membrane installed before it gets tiled over so you know it was done right.
Subfloor and Substrate Prep
Tile is rigid and unforgiving, so the surface beneath it must be solid and flat. Over a wood subfloor, add a cement backer board or an uncoupling membrane to handle movement and prevent cracked tiles. Over concrete, check for cracks and level any dips with a self-leveling compound. The flatness tolerance for floor tile is roughly 1/8 inch over 10 feet; anything worse causes lippage where tile edges sit proud of each other. This unglamorous prep work is what keeps the finished floor crack-free for decades.
Choosing a Color and Style That Lasts
Bathrooms get remodeled less often than other rooms, so favor finishes you will still like in ten years. Neutral large-format tile on the floor and walls reads timeless and makes a small bathroom feel larger. Save the trend-driven color and pattern for elements that are cheap to swap, like paint, towels, and accent tile in a niche. Light, consistent tones expand the perceived space, while a single bold feature wall or floor adds personality without dating the whole room.
Timeline and What to Expect
A bathroom tile remodel is disruptive, so plan for it. A typical full remodel runs one to three weeks depending on scope, with demolition, plumbing or electrical changes, waterproofing, tiling, grouting, and curing each taking their turn. Tile and grout need cure time before use, so the room is out of service longer than the active work days. If it is your only bathroom, line up an alternative and pad the schedule, since waterproofing and grout cannot be rushed.
Maintenance to Protect Your Investment
Once the work is done, simple upkeep keeps it looking new. Squeegee shower walls after use to cut down on soap scum and mineral buildup. Clean with pH-neutral products instead of acids that etch stone and erode grout. Reseal cement grout and natural stone on schedule, run the exhaust fan to control humidity, and address any cracked grout or loose tile promptly before water finds its way behind the surface.
Accessibility and Future-Proofing
A remodel is the smart time to build in features that pay off later. A curbless or low-threshold shower entry is safer and more accessible as you age, and it reads as a clean modern look today. Install blocking in the walls for grab bars even if you do not mount them now, so the structure is ready when needed. Choose a slip-resistant floor tile, a comfortable bench, and a handheld sprayer. These choices cost little extra during construction but are expensive and disruptive to retrofit into a finished bathroom.
The Bottom Line
A successful bathroom tile remodel is built from the substrate up. Prep the subfloor flat, pick durable porcelain, invest in a proper waterproofing membrane, plan your layout to avoid awkward cuts, and upgrade to epoxy grout in the shower. Choose timeless finishes, plan for the timeline, and maintain it well. Spend your attention on the parts you cannot see, and the parts you can see will still look beautiful and leak-free many years from now.
Prefer to explore on your own?
See how new flooring looks in your actual room in seconds — free, no signup.
Try the free Floor Studio →