A backsplash is the one tile project that beginners can genuinely pull off in a weekend, and it transforms a kitchen more than almost any other update for the money. Installing tile backsplash costs a fraction of a countertop replacement, uses a manageable amount of material, and lives at eye level where it makes a daily impression. The catch is that eye level also means every crooked line and uneven grout joint is on display. Getting the prep and layout right is what separates a pro-looking result from an obvious DIY job.
Part of our Kitchen Remodeling guide — explore the full guide →
- Tools and Materials You'll Need
- Preparing the Wall
- Planning Your Layout
- Applying Adhesive and Setting Tile
- Cutting Around Outlets and Corners
- Grouting for a Clean Finish
- Sealing and Final Touches
- Common Mistakes to Avoid
- Choosing the Right Tile for a Backsplash
- How Much Tile and Adhesive to Buy
- Frequently Asked Questions
Tools and Materials You’ll Need
Before you mix a drop of thinset, gather everything. Stopping mid-job to buy a tool while mortar is curing is a fast way to ruin a batch.
- Tile (buy 10-15% extra for cuts and breakage)
- Thinset mortar or premixed adhesive mastic
- 1/16 to 3/16-inch tile spacers
- Notched trowel (1/4-inch V-notch for mosaics, 1/4-inch square for larger tiles)
- Wet saw or manual snap cutter, plus tile nippers for curves
- Grout, grout float, and two large sponges
- Level, tape measure, pencil, and a chalk line
- Painter’s tape, drop cloths, and a bucket
For a standard kitchen with about 30 square feet of backsplash, budget $150 to $500 in materials depending on whether you choose basic ceramic subway tile or handmade glass mosaics. Hiring out the same job typically runs $10 to $25 per square foot in labor.
Preparing the Wall
Good adhesion starts with a clean, dry, sound surface. Wipe down the wall with a degreaser to remove cooking grease, then rinse. Fill any holes with spackle and sand them flush. If your wall has glossy paint, scuff it with 120-grit sandpaper so the mortar can grip.
Turn off power to the outlets and switches in the area at the breaker, then remove the cover plates. You’ll likely need to loosen the outlets and bring them forward so they sit flush with the new tile surface; box extenders help here. Lay down drop cloths over the counter and tape the top edge of the countertop to protect it.
Planning Your Layout
Layout is where the project is won or lost. Find the center of your main wall or the focal area behind the stove and mark a vertical plumb line. Working outward from the center keeps cut tiles balanced on both ends rather than leaving a sliver on one side.
Measure up from the countertop and check with a level, because countertops are rarely perfectly flat. If your counter slopes, snap a level horizontal reference line for your first row rather than trusting the counter as your baseline. Dry-lay a row of tiles on the counter with spacers to see how the pattern falls and where cuts will land. Adjust your starting point to avoid tiny slivers next to cabinets or windows.
Applying Adhesive and Setting Tile
Mix thinset to a peanut-butter consistency, or open your premixed mastic. Mastic is more forgiving for beginners on dry walls, but use thinset in areas near a sink or range where moisture is a factor. Spread only a two to three square-foot section at a time using the flat side of the trowel, then comb it with the notched edge held at a 45-degree angle to create even ridges.
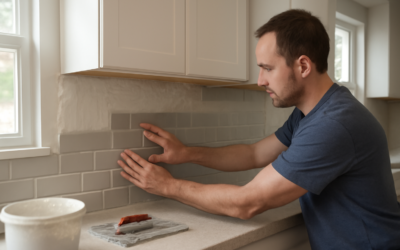
Press tiles into the mortar with a slight twist and insert spacers at each joint. For mosaic sheets, line up the edges carefully so the joints flow seamlessly from sheet to sheet. Check your work with a level every few tiles. Use a grout float or a flat block to gently bed the tiles to an even plane, a step called “beating in” that prevents lippage where one tile sits proud of its neighbor.
Cutting Around Outlets and Corners
Straight cuts are easy on a snap cutter or wet saw. Outlets require notches, and the cleanest approach is a wet saw for the two long cuts plus nippers to nibble out the waste, or a rotary tool with a tile bit. Measure each opening individually. Around window trim and inside corners, leave a small gap for a bead of caulk rather than tight-grouting an inside corner, which cracks over time.
Grouting for a Clean Finish
Let the adhesive cure for at least 24 hours before grouting. Choose unsanded grout for joints under 1/8 inch and sanded grout for wider joints. Mix a workable batch, then push it into the joints with the float held at a 45-degree angle, working diagonally across the tiles so you don’t drag grout back out of the lines.
Wait 10 to 15 minutes until the grout hazes, then wipe diagonally with a damp, well-wrung sponge. Rinse the sponge often and change the water frequently. A light haze will remain; buff it off with a dry microfiber cloth after a couple of hours. Avoid over-wetting, which weakens the grout and pulls color unevenly.
Sealing and Final Touches
Once the grout has cured for 48 to 72 hours, apply a penetrating grout sealer to resist stains, especially behind the range. Natural stone tile needs the tile itself sealed as well. Run a bead of color-matched silicone caulk along the joint where the backsplash meets the countertop and at inside corners; these are movement joints and grout will crack there.
Reinstall the outlet cover plates, restore power, and clean the tile face with a mild cleaner. Step back and inspect under raking light for any missed grout haze. A well-executed backsplash should read as one continuous, level plane with crisp, uniform joints.
Common Mistakes to Avoid
The errors that most often show up on DIY backsplashes are starting from an unlevel countertop, spreading too much mortar so it oozes into the joints, grouting before the adhesive cures, and skipping the caulk joint at the counter. Take your time on layout, work in small sections, and resist the urge to rush the curing windows. Done patiently, installing tile backsplash is one of the most satisfying and durable upgrades you can make to a kitchen or bath.
Choosing the Right Tile for a Backsplash
Not every tile behaves the same on a wall. Glazed ceramic and porcelain are the most forgiving for beginners; they’re consistent in size, easy to clean, and shrug off grease. Glass mosaics look stunning but demand a smoother thinset application because the adhesive shows through translucent tiles, so use a white thinset rather than gray. Natural stone (marble, travertine, slate) brings texture and character but is porous, so it must be sealed before grouting to prevent the grout from staining the stone.
Consider the tile size relative to your space. Small mosaics and classic 3-by-6-inch subway tiles suit tight backsplash areas and forgive minor wall irregularities. Large-format tiles create a sleek, low-grout look but require a very flat wall, since any hump causes lippage. For a first project, a mesh-backed mosaic sheet or standard subway tile gives the best odds of a clean result.
How Much Tile and Adhesive to Buy
Measure the length of each wall section and multiply by the height from countertop to the underside of the upper cabinets, usually 18 inches. Subtract the area of the range hood or window openings, then add 10 to 15 percent for cuts and breakage. Buy all your tile from the same lot or dye number so the color matches across boxes. One gallon of premixed mastic or one bag of thinset covers roughly 30 to 40 square feet at backsplash trowel sizes, and a standard bag of grout handles about the same area depending on joint width.
Frequently Asked Questions
Can I tile over painted drywall?
Yes, as long as the paint is sound and you scuff glossy areas so the adhesive can grip. In splash-prone zones near a sink, cement backer board or a waterproof membrane is a better substrate than drywall.
Do I need to seal the grout?
Seal cement-based grout after it cures, especially behind a range where grease and moisture hit it. Epoxy grout is naturally stain-resistant and doesn’t require sealing, though it’s harder to work with.
How long before I can use the kitchen?
Let the adhesive cure 24 hours before grouting, then give the grout 24 to 72 hours before heavy use and sealing. Avoid splashing the fresh grout during that window.
Prefer to explore on your own?
See how new flooring looks in your actual room in seconds — free, no signup.
Try the free Floor Studio →