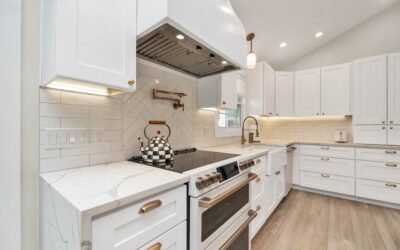
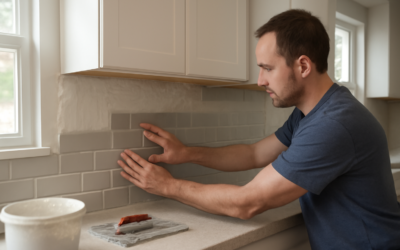
A backsplash is one of the highest-impact upgrades in any kitchen, and it is also one of the most achievable weekend projects for a confident DIYer. Done well, tile backsplash installation protects your wall from splashes and grease while giving the whole room a finished, custom look for a fraction of the cost of a full remodel.
Part of our Kitchen Remodeling guide — explore the full guide →
This guide walks through the full process—planning, tools, surface prep, setting tile, cutting around outlets, and grouting—so you understand what the job really involves before you pick up a trowel.
- Planning Your Backsplash
- Tools and Materials You’ll Need
- Preparing the Wall Surface
- Setting Out Your Layout
- Applying Adhesive and Setting Tile
- Cutting Tile Around Outlets and Edges
- Grouting and Finishing
- Choosing the Right Tile and Adhesive
- Common Mistakes to Avoid
- Peel-and-Stick vs. Traditional Tile
- Caring for Your Finished Backsplash
- Cost and Time Expectations
Planning Your Backsplash
Before buying anything, decide on your coverage area and tile. The most common backsplash runs from the countertop up to the underside of the upper cabinets, usually 18 inches of vertical space. Behind a range or cooktop, many homeowners extend the tile all the way to the hood as a focal point.
Measure the length of each wall section, multiply by the height, and add the areas together for total square footage. Add roughly 10 to 15 percent extra for cuts, waste, and future repairs. Popular choices include subway tile, mosaic sheets on mesh backing, and larger format porcelain.
Tools and Materials You’ll Need
Gather everything before you start so you are not running to the store with wet mortar setting up. A basic backsplash job calls for:
- Tile and a matching amount of thinset mortar or pre-mixed mastic adhesive
- Notched trowel (typically 3/16 or 1/4 inch)
- Tile spacers to keep grout lines even
- A wet saw or a tile cutter, plus tile nippers for curves
- Grout, a rubber grout float, and grout sealer
- Level, tape measure, pencil, sponges, and buckets
- Painter’s tape and drop cloths to protect counters
Preparing the Wall Surface
Good prep is the difference between tile that stays put for decades and tile that cracks or pops loose. Turn off power to the outlets in the work area at the breaker. Remove outlet and switch cover plates, and unscrew the receptacles enough to pull them slightly forward so tile can sit behind their edges.
Clean the wall thoroughly to remove grease, then lightly sand glossy paint so the adhesive can grip. Fill any large holes or dents. Wipe the surface free of dust. A clean, flat, dry wall gives your mortar the best possible bond.
Setting Out Your Layout
Never assume your countertop or cabinets are perfectly level—most are not. Find the center of your main wall and use a level to mark reference lines. Dry-lay a row of tile along the counter to see how the pattern falls and where cuts will land.
Aim to avoid tiny sliver cuts at the ends of a wall or at outlets, since they look awkward and are hard to cut cleanly. Shifting your starting point an inch or two often balances the cuts on both ends. For patterned or mosaic sheets, plan how seams between sheets will align.
Working Around Focal Points
If you have a decorative accent strip or a picture-frame pattern behind the range, lay that out first and build the field tile around it. This keeps the centerpiece symmetrical.
Applying Adhesive and Setting Tile
Mix thinset to a peanut-butter consistency, or open your tub of mastic. Using the flat side of the trowel, press a thin coat onto a small section of wall—only as much as you can tile before it skins over, usually two to three square feet. Then comb the adhesive with the notched edge held at a consistent angle to create even ridges.
- Press each tile firmly into place with a slight twist to collapse the ridges.
- Insert spacers at the corners to hold consistent grout lines.
- Check your work with a level every few tiles and adjust before the adhesive sets.
- Wipe excess adhesive out of the grout joints as you go—it is much harder to remove later.
Work in sections across and up the wall, keeping your reference lines in view so the field stays square.
Cutting Tile Around Outlets and Edges
Cuts are where careful measuring pays off. For straight cuts, a manual snap cutter is fast; for L-shaped cuts around outlets or curved cuts around pipes, a wet saw and tile nippers give the cleanest result. Measure twice, mark the tile, and cut just outside your line so you can fine-tune.
At outlets, the surrounding tile should sit behind the cover plate’s edge once everything is reassembled. Use outlet spacers or screw the receptacle back out flush with the new tile depth so the plate sits flat.
Grouting and Finishing
Let the adhesive cure per the manufacturer’s instructions, typically 24 hours, before grouting. Remove all spacers. Mix grout to a smooth consistency and spread it diagonally across the joints with the rubber float, pressing to pack the lines fully.
- Wait about 15 to 20 minutes, then wipe the surface with a damp sponge to clean off haze.
- Rinse the sponge often and avoid pulling grout out of the joints.
- After the grout cures, buff off any remaining film with a dry cloth.
- Apply grout sealer once fully cured to resist stains, especially with light-colored grout.
Finish by running a bead of flexible caulk along the joint where the tile meets the countertop. This seam moves seasonally and will crack if filled with rigid grout.
Choosing the Right Tile and Adhesive
The tile and adhesive you pick shape both the look and the difficulty of the job. For a first backsplash, easier materials save frustration:
- Ceramic and porcelain subway tile: Inexpensive, forgiving, and cut cleanly—the friendliest choice for beginners.
- Mosaic sheets on mesh backing: Fast to install because many small tiles set at once, though seams between sheets need care.
- Glass tile: Beautiful but requires a white adhesive that will not show through, plus careful cutting to avoid chips.
- Natural stone: Elegant but porous, so it must be sealed and handled gently.
For adhesive, pre-mixed mastic is convenient and grabs quickly, making it popular for walls, while thinset mortar offers a stronger bond and is required for heavier tiles and glass. Match the adhesive to your tile and check the manufacturer’s recommendation before buying.
Common Mistakes to Avoid
Most backsplash failures trace back to a handful of avoidable errors. Watch for these:
- Skipping the level lines and trusting the countertop, which is rarely truly level.
- Spreading too much adhesive at once so it skins over before you set the tile.
- Leaving adhesive in the grout joints, which prevents grout from filling them fully.
- Grouting before the adhesive has cured, which can shift tiles out of alignment.
- Filling the counter-to-tile seam with rigid grout instead of flexible caulk, causing cracks.
- Rushing the cleanup and leaving a hazy grout film that is hard to remove later.
Patience at each stage—layout, setting, curing, and grouting—is what separates a professional-looking result from an obvious DIY job.
Peel-and-Stick vs. Traditional Tile
If a full mortar-and-grout installation feels daunting, peel-and-stick tile is an alternative worth understanding. Weighing it against traditional tile helps you pick the right path:
- Peel-and-stick: Adhesive-backed tiles that press directly onto the wall—fast, no mortar or grout, and renter-friendly, but less durable and not ideal behind a cooktop or sink where heat and water are intense.
- Traditional tile: Real ceramic, porcelain, or stone set in adhesive and grouted—far more durable, heat- and water-resistant, and permanent, but more labor and skill.
For a long-term kitchen backsplash that adds real value, traditional tile is the better investment. Peel-and-stick suits rentals, quick refreshes, or low-exposure areas where speed and reversibility matter more than longevity.
Caring for Your Finished Backsplash
Once the backsplash is installed and cured, a little routine care keeps it looking new for years. A backsplash’s whole job is to take splashes and grease, so regular cleaning matters:
- Wipe the surface with a soft cloth and mild cleaner to remove cooking grease and splatters.
- Avoid harsh abrasives that can dull glazed tile or wear at grout.
- Reseal grout periodically, especially light-colored grout, to keep it stain-resistant.
- Address any cracked grout or caulk promptly so water cannot get behind the tile.
- Reapply the flexible caulk bead along the countertop seam if it shrinks or discolors over time.
Because the counter-to-tile seam moves with seasonal expansion, that caulk line is the part most likely to need occasional attention—keeping it fresh protects the wall behind and keeps the whole backsplash looking crisp. With minimal upkeep, a well-installed tile backsplash easily lasts for decades.
Cost and Time Expectations
Materials for a typical kitchen backsplash often run $10 to $25 per square foot for mid-range tile, plus adhesive and grout. A DIY installation for an average kitchen might cost $200 to $600 in materials. Hiring a professional generally adds $8 to $20 per square foot in labor, bringing installed costs to roughly $1,000 to $2,500.
Plan for a two-day project: one day to set tile, one day to grout after the adhesive cures. Careful tile backsplash installation rewards patience, so do not rush the layout or the cure times, and you will end up with a durable, professional-looking surface you built yourself.
Prefer to explore on your own?
See how new flooring looks in your actual room in seconds — free, no signup.
Try the free Floor Studio →