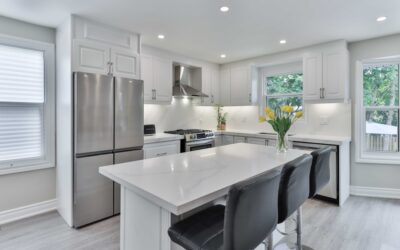
The kitchen island base is the part nobody sees once the countertop lands, and it is the part that decides whether your island feels rock-solid or wobbles every time someone leans on it. After building dozens of these over the years, I can tell you the base does three jobs at once: it carries the weight of a stone top, it anchors the whole unit to your floor, and it hides the wiring and plumbing you run underneath. Get the base right and everything else falls into place.
Part of our Kitchen Remodeling guide — explore the full guide →
Most homeowners assume they need a custom-built structure. They usually do not. A well-planned kitchen island base can be assembled from stock cabinets you buy off the shelf, and the money you save goes toward a nicer countertop. Let me walk you through both the buy-and-assemble route and the from-scratch build, plus the details that separate a professional result from a weekend project that ages badly.
Stock Base Cabinets Bolted Together
The workhorse method is joining two or three standard 24-inch-deep base cabinets back-to-back or side-by-side. A single island run might use a 36-inch sink base flanked by two 18-inch drawer bases. Set them tight, clamp the face frames or cabinet sides together, and drive 1-1/4-inch cabinet screws through the stiles so the heads stay hidden.
Because island cabinets have finished backs exposed to the room, you either buy cabinets with two finished sides or apply 1/4-inch plywood panels to cover the raw particleboard. When you place cabinets back-to-back to create a deeper island, leave a 3 to 6-inch gap between the two rows. That void becomes your chase for electrical and plumbing, and it gives the countertop fabricator a solid perimeter to fasten to.
- Standard base cabinet height is 34-1/2 inches; add a 1-1/2-inch counter and you land at the 36-inch work surface everyone expects.
- Cabinet widths come in 3-inch increments from 9 to 48 inches, so you can dial in almost any island footprint.
- Bolt units with the doors and drawers removed. It is far easier to reach the screws with the boxes empty.
Furniture-Style and Custom Bases
Not every island is a box of cabinets. Furniture-style bases give you turned legs, a butcher-block look, and open shelving instead of a wall of doors. You can build one from a 2×4 or 2×6 frame skinned with hardwood or plywood, or you can buy a pre-made table-leg island base and top it yourself. These read warmer than cabinetry and work beautifully in a farmhouse or transitional kitchen.
The tradeoff is storage and rigidity. A leg-based island has no closed cabinet box bracing it, so you need corner blocking and a stout apron to keep it from racking. I run diagonal braces at each leg and glue-and-screw a 3/4-inch plywood shelf midway down to tie the four legs together. That single shelf does more for stability than any amount of extra hardware.
Corbels and Support for Overhangs
Any part of the countertop that hangs past the cabinet needs support, and the rule is straightforward. Granite and quartz can cantilever roughly 10 to 12 inches unsupported. Push past that for a seating overhang and you need corbels, steel brackets, or a support panel. For a proper 15 to 18-inch bar overhang I install L-shaped steel plates let into the top of the cabinet so they disappear under the stone.
Decorative wood corbels are fine for shorter spans and for the look, but do not trust them alone for a full 24-inch seating overhang. That depth wants hidden steel every 24 to 30 inches. Countertop weight is real: a 3-centimeter quartz slab runs about 25 pounds per square foot, so a large island top can top 300 pounds before anyone sets down a plate.
Securing the Base to the Floor
An unanchored island is the single most common mistake I see. Lean on the counter edge and the whole thing shifts. The fix is cleats. Cut 2×2 or 2×4 blocks, position the island exactly where it belongs, trace the inside of the toe kick, then screw the cleats to the floor just inside that line.
- Dry-fit the assembled base and mark its footprint on the finished floor with painter’s tape.
- Fasten cleats to the subfloor with 3-inch screws; on concrete use masonry anchors or construction adhesive.
- Drop the cabinet over the cleats and screw down through the cabinet bottom into the blocks.
Anchoring also lets you fine-tune the position for walkway clearance. Keep at least 42 inches of aisle around a working island, and 48 inches if two cooks pass or an appliance door swings into that lane. A 36 to 42-inch clearance can feel tight the day you host.
Leveling the Base
Floors are never flat, and a stone top will crack over an unlevel base. Set the assembled cabinets in place and check with a 4-foot level in both directions. Shim under the cabinet bottom at the low corners using composite shims, which will not compress or rot the way soft wood can. Adjustable cabinet legs are even better; you spin them until the box sits dead level, then clip on a toe-kick panel to hide them.
Do all your leveling before the countertop template is made. A fabricator measures off the leveled cabinets, so if you shim afterward you throw the fit off. Confirm the top edges of every cabinet sit in the same plane, because that plane becomes the bearing surface for the slab.
Adding Electrical to the Island
Modern code requires receptacles on most islands, and even where it is optional, you will want power for a mixer or a phone charger. Running it means bringing a circuit up through the floor inside that back-to-back chase before the base is closed in. This is a job to coordinate with your electrician and to permit properly.
- Plan the outlet location before assembly so the floor penetration lands inside the cabinet, not under a drawer box.
- Leave the chase between back-to-back cabinets open until the electrician has fished the cable and set the box.
- Pop-up and side-mount receptacles keep the clean look many homeowners want on a furniture-style island.
If you are adding a sink or cooktop later, rough in the plumbing and gas at this same stage. Opening a finished island back up to chase a supply line is miserable work you can avoid with ten minutes of planning now.
Materials and Prices
Buy the best box you can afford, because the base takes abuse. Plywood cabinet boxes resist moisture and hold screws far better than particleboard, and they matter most on the sink cabinet where drips are inevitable. Particleboard is cheaper and fine for a dry drawer base, but it swells if it ever gets wet and it strips out under repeated stress.
Expect to spend roughly $150 for a single stock base cabinet at a big-box store, and $400 to $1,200 to assemble a multi-cabinet island base in semi-custom lines. A furniture-style pre-made base runs $300 to $900 before the top. Panel the exposed ends and back with matching 1/4-inch finished plywood, budgeting $40 to $120 for those panels, and add end panels wherever a cabinet side faces the room so no raw box shows.
One last piece of advice: think through the whole island before you buy a single cabinet. Sketch the footprint, mark the overhangs, note where power and water enter, and confirm your clearances. The base is the bones of the island, and bones are hard to change once the stone is on top. Spend the planning time up front and the assembly itself goes smoothly in a weekend.
Finished Ends and Toe Kicks
The difference between an island that looks builder-grade and one that looks custom often comes down to how the ends are treated. A raw cabinet side facing the room is a dead giveaway that corners were cut. Order cabinets with finished end panels, or apply 3/4-inch furniture-grade plywood or a matching slab panel over the exposed sides. On the seating side of a working island, homeowners frequently add beadboard, shiplap, or a shaker-style applied panel to dress up what would otherwise be a plain box back.
Toe kicks deserve the same attention. A standard toe kick is 4 inches high and 3 inches deep, and it gives you a place to stand close to the counter without stubbing your toes. On a furniture-style base you may skip the toe kick entirely and let the legs read as furniture, which is a deliberate design choice rather than an oversight. Whatever you pick, run the toe-kick material or leg style consistently around all four sides so the island looks intentional from every angle.
- Match the finished-end panel to your door style, not just the door color, so the grain and profile line up.
- Apply a decorative back panel to hide the plain cabinet backs on the seating side.
- Caulk and paint the seams where panels meet the cabinet box for a seamless, built-in look.
Common Base-Building Mistakes
A few errors show up again and again, and every one is avoidable. The first is skipping the floor anchor, which I covered earlier but cannot stress enough; an unanchored island is the number one callback I get. The second is trusting particleboard on a sink base, where a single unnoticed leak swells the box within a season. The third is templating the countertop before the cabinets are fully leveled and anchored, which throws the stone fit off by the width of a shim.
The last mistake is underestimating weight. People forget that a large quartz or granite top can weigh 300 pounds or more, and they build a base that flexes under it. Reinforce the top of the cabinet run with a continuous 3/4-inch plywood subtop screwed across all the boxes, and you spread that load evenly. Do these four things right and your base will outlast the countertop sitting on it.