The reason luxury vinyl plank exploded in popularity comes down to one feature: the joint. LVP tongue and groove connections let planks lock together without glue or nails, turning what was once a contractor-only job into a realistic weekend project. Understanding how this interlocking system works, and how to install it correctly, is the key to a floating floor that stays tight and looks professional for years.
How Tongue and Groove LVP Works
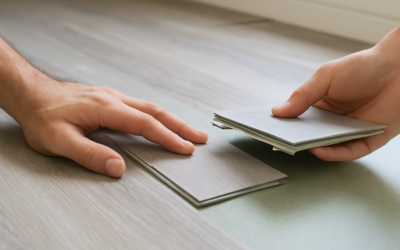
Each luxury vinyl plank has a protruding tongue on one long edge and a recessed groove on the opposite edge. The tongue of one plank fits into the groove of the next, creating a continuous, mechanically locked surface. Most modern LVP uses a click-lock variation where the planks angle in and snap down, eliminating the need for adhesive.
The result is a floating floor, meaning it is not fastened to the subfloor. The planks hold together as a single mass that can expand and contract slightly with temperature. This is why LVP installs so quickly and why it tolerates minor subfloor imperfections better than glued-down or nailed flooring.
Tongue and Groove Versus Other LVP Systems
Not all vinyl plank uses the same connection. Knowing the differences helps you buy the right product.
- Click-lock tongue and groove: the most common floating system, angle-and-snap or drop-and-lock, glueless and DIY-friendly.
- Glue-down LVP: planks adhered directly to the subfloor, more stable for large commercial spaces but harder to install and replace.
- Loose-lay LVP: heavy planks that grip with friction and perimeter adhesive, easy to swap but limited in product range.
For most homeowners, click-lock tongue and groove is the sweet spot of ease, performance, and product selection.
Step-by-Step Installation
A tongue-and-groove floating floor is achievable for a confident DIYer with basic tools. Follow this sequence for a clean result.
- Acclimate the unopened boxes in the room for 24 to 48 hours.
- Prep the subfloor so it is clean, dry, and flat within about 3/16 inch over 10 feet.
- Plan the layout and stagger end joints at least 6 to 8 inches between rows.
- Set spacers for a 1/4 to 3/8 inch expansion gap around the perimeter.
- Lock the planks, angling the tongue into the groove and pressing down until it clicks.
- Cut planks with a utility knife scored and snapped, or a jigsaw for curves.
- Install trim and transitions to cover the expansion gap.
Pros of Tongue and Groove LVP
The interlocking floating system carries real advantages.
- DIY-friendly installation with no glue, nails, or specialized adhesives.
- Fast results, with many rooms completed in a day.
- Easy repairs, since damaged planks can often be unlocked and replaced.
- Waterproof construction on most rigid-core products.
- Forgiving over minor subfloor flaws, unlike glue-down.
Cons and Limitations
The floating system is not flawless.
- Sensitive to uneven subfloors, which cause clicking and movement underfoot.
- Expansion gap required, so it cannot butt tight to walls.
- Locking edges can chip if forced or mishandled during install.
- Large rooms may need transition strips to limit movement across long spans.
What It Costs
LVP pricing is one of its strongest selling points. Expect these USD ranges for tongue-and-groove products:
- Material: $2 to $5 per square foot for mid-grade, $5 to $7 plus for premium rigid-core.
- DIY install: essentially free beyond underlayment and trim, often under $0.50 per square foot in materials.
- Professional install: $1.50 to $4 per square foot for labor.
A DIY tongue-and-groove install is one of the best value upgrades in flooring.
Underlayment and Subfloor Tips
Many rigid-core LVP planks include an attached pad, but some require a separate underlayment for sound and comfort. Check the manufacturer’s spec, because adding a second pad under an attached-pad plank can void warranties and cause excess flex. Over concrete, confirm whether a vapor barrier is needed. Above all, flatten the subfloor first; the most common cause of a clicking, bouncy LVP floor is an uneven subfloor, not the planks themselves.
Common Mistakes to Avoid
A few errors trip up first-timers. Do not skip acclimation, which lets planks reach room conditions before locking. Do not eliminate the expansion gap, since a floating floor needs room to move or it will buckle. Avoid aligning end joints in adjacent rows, which weakens the floor and looks artificial. And resist hammering planks together with a metal tool that can crack the locking edge; use a tapping block instead.
Drop-Lock Versus Angle-Lock Systems
Not all click-lock LVP connects the same way, and the mechanism affects how easy the floor is to install. Angle-lock systems require you to tilt each plank into the previous row’s groove and press it flat, which is fast along long edges but can be awkward on the short end joints. Drop-lock or tap-lock systems let you lay a plank flat and tap it down or sideways into place, which is easier in tight spots like under door casings.
Many premium products combine an angle-lock long edge with a drop-lock short edge, giving you the best of both. When shopping, ask which system a product uses, since a drop-lock end joint can make a noticeable difference in how smoothly your installation goes, especially for a first-time DIYer working around obstacles.
Tools You Will Need
One appeal of tongue-and-groove LVP is the short tool list. You can install most floating LVP floors with just a few inexpensive items.
- A sharp utility knife with extra blades for score-and-snap cuts.
- A tapping block and a rubber mallet to seat joints without damaging the edges.
- A pull bar for locking the final row against the wall.
- Spacers to maintain the expansion gap.
- A speed square and tape measure for accurate cuts.
For curved cuts around pipes and door jambs, a jigsaw with a fine blade helps. That modest kit, often under $100 if you do not already own the basics, is all most rooms require, which is a big part of why LVP has become the DIY favorite.
The Bottom Line
LVP tongue and groove flooring brought professional-quality floors within reach of everyday homeowners. The glueless click-lock system installs fast, repairs easily, and resists water, all at a material cost of $2 to $7 per square foot. Prep your subfloor flat, leave the expansion gap, stagger the joints, and a tongue-and-groove vinyl floor will deliver durable, waterproof good looks that belie how simple it was to install.
Prefer to explore on your own?
See how new flooring looks in your actual room in seconds — free, no signup.
Try the free Floor Studio →