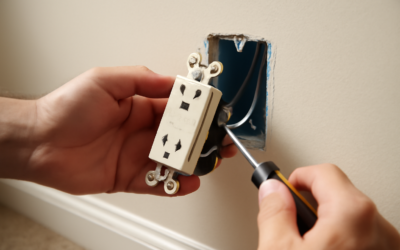
An outdoor GFCI outlet is the single cheapest piece of hardware standing between you and a serious shock when you plug in a mower, string trimmer, or holiday lights on a damp lawn. Water and electricity are a lethal pair, and that little receptacle with the TEST and RESET buttons is engineered to cut power in about a fortieth of a second when current starts leaking where it shouldn’t. I’ve installed hundreds of these over the years, and most homeowners either don’t have one where they need it or have one that’s failed silently. This guide walks you through what a GFCI does, where code requires them, how to install one, and when to hand the job to a licensed electrician.
Part of our Windows & Doors guide — explore the full guide →
- What a GFCI Actually Does
- Where Code Requires Outdoor GFCI Protection
- Receptacle vs. Breaker: Two Ways to Get Protection
- Weatherproof Covers: The In-Use Bubble Cover
- How to Install an Outdoor GFCI Outlet
- Choosing the Right Location and Height
- Maintenance and Twice-a-Year Testing
- Common Problems and How to Troubleshoot Them
- Costs and When to Call a Pro
What a GFCI Actually Does
GFCI stands for ground-fault circuit interrupter. The device constantly compares the current flowing out on the hot conductor against the current returning on the neutral. Those two numbers should match exactly. If as little as 4 to 6 milliamps goes missing — say, because it’s traveling through your body to the wet ground instead of back down the neutral — the GFCI senses the imbalance and trips the circuit open in roughly 25 milliseconds.
That is fast enough to prevent electrocution in most scenarios. A standard breaker in your panel only trips on overcurrent, usually 15 or 20 amps. It will happily let 100 milliamps flow through your chest all day long without blinking. The GFCI protects people; the breaker protects wiring. You need both.
Where Code Requires Outdoor GFCI Protection
The National Electrical Code (NEC) has required GFCI protection for outdoor receptacles since the 1970s, and each cycle has tightened the rules. Under NEC 210.8(A), all 125-volt, 15- and 20-amp receptacles in outdoor locations must be GFCI-protected. That covers:
- Receptacles on exterior walls, front and back of the house
- Outlets serving decks, porches, and patios
- Pool, spa, and hot tub equipment areas (with additional distance rules)
- Receptacles in detached garages and outbuildings
- Anything supplying HVAC condensers, which more recent code cycles now include
If your home was built before these rules or updated by a previous owner, you may have an ordinary outlet outside. Retrofitting a GFCI is a legitimate and worthwhile upgrade. When in doubt, protection is never wrong — installing a GFCI where one isn’t strictly required still passes inspection.
Receptacle vs. Breaker: Two Ways to Get Protection
You can add ground-fault protection in one of two spots. A GFCI receptacle, the outlet with the buttons, installs at the point of use and runs about $15 to $25. A GFCI circuit breaker installs in your panel, protects the entire circuit, and costs $40 to $60 depending on the panel brand.
For a single outdoor outlet, the receptacle is almost always the better choice — cheaper, easier to test, and simpler to reset without walking to the basement. The breaker makes sense when you’re protecting a long run with several outlets, or when the outdoor box is too shallow for the bulkier GFCI body. One GFCI receptacle can also protect additional standard outlets downstream if you wire them to its LOAD terminals, which saves money on multi-outlet runs.
Weatherproof Covers: The In-Use Bubble Cover
The receptacle is only half the assembly. Outdoors, code (NEC 406.9) requires a weatherproof enclosure. There are two ratings you’ll see:
- Weather-resistant (WR): The receptacle itself must be marked “WR.” This is a corrosion-resistant device rated for damp and wet exposure. It’s required for all outdoor outlets.
- In-use / “bubble” cover: A hinged clamshell cover that stays weatherproof even while a cord is plugged in. Any outlet exposed to rain — meaning most outdoor locations — needs this. The old flip-lid covers that only seal when empty are no longer compliant for wet locations.
Buy a WR-rated receptacle and a deep in-use cover together. Expect to pay $10 to $20 for a decent metal or heavy polycarbonate bubble cover. The cheap thin-plastic ones crack and yellow within two summers.
How to Install an Outdoor GFCI Outlet
Replacing an existing outdoor outlet with a GFCI is a manageable project for a confident DIYer. Adding a brand-new circuit or running new cable is a job for a licensed electrician and usually requires a permit. Here’s the replacement process:
- Kill the power. Switch off the breaker feeding the outlet. This is non-negotiable — do it first.
- Verify it’s dead. Touch a non-contact voltage tester to the outlet, then confirm with a plug-in tester or multimeter across the terminals. Never trust the breaker label alone; test every conductor before you touch it.
- Remove the old device. Unscrew the cover and receptacle, pull it out, and photograph the wiring before disconnecting anything.
- Identify LINE and LOAD. The incoming power (from the panel) connects to the LINE terminals. Any wires continuing to downstream outlets go on LOAD. Getting these reversed is the number-one wiring mistake — the GFCI won’t protect and won’t reset properly.
- Connect the conductors. Black to brass (hot), white to silver (neutral), bare copper to the green ground screw. Match LINE and LOAD as identified.
- Mount and seal. Fold the wires in carefully, screw the device to the box, install the WR gasket, then the in-use cover.
- Restore power and test. Turn the breaker back on, press RESET, then press TEST — power should cut. Press RESET again. Confirm with a $6 plug-in outlet tester that ground and polarity are correct.
Choosing the Right Location and Height
Placement matters as much as the device itself. Mount an outdoor receptacle at least 12 inches above finished grade, and higher — 18 to 24 inches — anywhere snow piles up or splashback is likely. Keep it out from under a deck’s drip line where possible, and tuck it under a soffit or eave when you can so rain never reaches it directly. For convenience, put an outlet within a few feet of the driveway, one near the front door for holiday lighting, and one at each corner of the back of the house so a 25-foot cord reaches the whole yard.
Give some thought to how you’ll actually use it. A receptacle behind a shrub or blocked by an AC condenser is useless. If you run landscape lighting or a pond pump year-round, dedicate a switched or timer-controlled circuit rather than tying up the general-purpose outlet you need for tools.
Maintenance and Twice-a-Year Testing
A GFCI is a mechanical-electronic device, and it can fail without any outward sign. Test yours every six months — a good habit is to pair it with changing smoke-detector batteries at the daylight-saving clock changes. Press TEST; power should cut and the RESET button should pop out. Press RESET to restore it. If pressing TEST does nothing, or the button won’t reset, replace the device immediately.
Beyond testing, give the outdoor units a visual once-over each spring: check the in-use cover for cracks, confirm the gasket still seals, and look for insect nests or corrosion inside the enclosure. Wasps love these boxes. A tube of clear silicone and a five-minute inspection prevent most water-intrusion trips before the mowing season starts.
Common Problems and How to Troubleshoot Them
If your new device won’t hold a reset, the most likely culprit is reversed LINE and LOAD wiring — swap them. If it trips the moment it rains, you may have water intrusion in the box or a genuine ground fault in a downstream appliance; unplug everything and reset to isolate the source. Nuisance trips on long circuits sometimes come from accumulated leakage across many devices, in which case a downstream fault or a deteriorating cable is worth investigating. A GFCI that won’t trip at all when you press TEST is dead and must be replaced immediately — don’t keep using it.
Costs and When to Call a Pro
A straight swap of an existing outdoor outlet runs $15 to $45 in parts. Hiring a licensed electrician for the same swap typically costs $120 to $200 including labor. Running a new outdoor circuit — trenching, burying conduit or UF cable, adding a box, and getting it inspected — runs $250 to $700 or more depending on distance and whether you need a permit.
Do the job yourself if you’re comfortable working in a de-energized box and confident about LINE and LOAD. Call a professional if you’re adding a new circuit, working near a pool or spa, dealing with aluminum wiring, or you open the box and find a rat’s nest of unlabeled conductors. Permits exist for a reason: an inspector catches the small mistakes that start fires years later. An outdoor GFCI outlet is a small investment that protects your family every time someone reaches for a plug in the rain — get it right, and test it twice a year.