First laid in a New York transit station in 1904, the humble 3×6 rectangle has outlasted nearly every design trend since. A subway tile backsplash remains the most requested kitchen finish in America because it is affordable, endlessly versatile, and almost impossible to make look dated. Whether you want a crisp white running bond or a moody herringbone in matte navy, this tile adapts. Better still, it is one of the friendliest tiling jobs for a first-time DIYer, with a full kitchen backsplash often costing under $400 in materials.
Part of our Kitchen Remodeling guide — explore the full guide →
- Why Subway Tile Endures
- Choosing Your Material
- Layout Patterns That Change the Whole Look
- Grout: The Detail That Defines the Design
- What You Will Need
- Installing It Step by Step
- Cost to Tile a Kitchen
- Design Ideas Beyond Plain White
- Estimating How Much Tile to Buy
- Dealing With Outlets and Edges
- Keeping It Looking New
Why Subway Tile Endures
The appeal starts with proportion. That classic 1:2 ratio reads as clean and orderly, and the glossy glaze bounces light around a kitchen, making small spaces feel brighter. Because production runs are enormous, prices stay low, often $2 to $7 per square foot for ceramic. The tile also plays well with every cabinet style, from Shaker to slab-front modern.
Durability seals the deal. Glazed ceramic shrugs off grease splatter, wipes clean with a damp cloth, and resists the heat and moisture a cooktop throws at it. Replace a chipped tile decades later and you can still buy an identical match at any home center.
Choosing Your Material
Subway tile comes in more than plain white ceramic, and the material affects both look and budget. Match the choice to how hard your kitchen works.
- Glazed ceramic: The default and cheapest option, easy to cut and forgiving for beginners.
- Porcelain: Denser and slightly pricier at $4 to $10 per square foot, with better durability for a high-use kitchen.
- Glass: Translucent and luminous, $7 to $20 per square foot, but it shows adhesive through the body, so it needs white thinset.
- Natural stone: Marble or travertine subway tiles bring luxury at $10 to $30 per square foot and require sealing.
- Zellige and handmade: Irregular, artisanal tiles with subtle color variation for a high-end organic look.
Layout Patterns That Change the Whole Look
The single biggest style decision is not the tile, it is the pattern. The same white 3×6 reads completely differently depending on how you set it.
- Running bond (50% offset): The traditional brick-like stagger. Timeless and beginner-friendly.
- Stacked (grid): Tiles aligned in straight vertical and horizontal lines for a modern, architectural feel.
- Herringbone: Tiles set at 45 degrees in a zigzag. Dramatic but wastes more tile and takes longer.
- Vertical stack: Turn the tiles upright to draw the eye toward the ceiling and make low walls feel taller.
- Third offset (33%): A subtle twist on running bond that avoids the “lippage” some large tiles show at a half offset.
Grout: The Detail That Defines the Design
Grout color is where a subway backsplash turns personal. A matching white grout on white tile creates a seamless, almost solid surface that recedes quietly. Choose a contrasting dark gray or black grout and suddenly every tile is outlined, giving that graphic, industrial look popular in modern farmhouse kitchens.
For a backsplash, use unsanded grout in joints narrower than 1/8 inch, which is standard for subway tile. Seal cement grout after it cures, or skip that step entirely by choosing a pre-mixed urethane or epoxy grout that resists stains and never needs sealing. Around the cooktop and behind the sink, that stain resistance is worth the extra $30 a tub.
What You Will Need
Gather your tools before you spread a single dab of adhesive. A tiling job stalls fast when you have to run to the store mid-set.
- Notched trowel, 3/16-inch V-notch for these small tiles
- Premixed mastic or thinset mortar
- 1/16-inch or 1/8-inch tile spacers
- Manual snap cutter, plus a wet saw or nippers for outlets
- Grout, float, sponge, and buckets
- Painter’s tape, level, and a tape measure
Installing It Step by Step
Start with a clean, flat wall. Wipe off grease, patch any holes, and lightly scuff glossy paint so adhesive grips. Find the center of your main wall and use a level to mark a plumb line, since cabinets and countertops are rarely perfectly straight.
Spread only two or three square feet of adhesive at a time so it does not skin over. Comb it with the notched edge, then press tiles in with a slight twist, inserting spacers as you go. Work upward from your reference line. Cut tiles to fit around outlets and at the ends using a snap cutter for straight cuts and nippers for notches. Let the adhesive cure the full 24 hours before grouting.
Grouting goes fast: force grout into the joints diagonally with the float, wait about 15 minutes, then wipe the haze with a barely damp sponge. Do a final buff with a dry cloth an hour later. Run a bead of color-matched silicone caulk, not grout, where the tile meets the countertop, because that joint flexes and rigid grout would crack.
Cost to Tile a Kitchen
A typical kitchen backsplash covers 30 to 40 square feet. Here is what a DIY project versus a professional installation runs in 2026.
- Ceramic tile and supplies (DIY): $150 to $400 for an average kitchen.
- Upgraded glass or stone tile: $500 to $1,200 in materials.
- Professional installation labor: $10 to $25 per square foot.
- Total pro-installed project: $800 to $2,000.
Doing it yourself easily cuts the cost in half, and the skills transfer to future tile projects.
Design Ideas Beyond Plain White
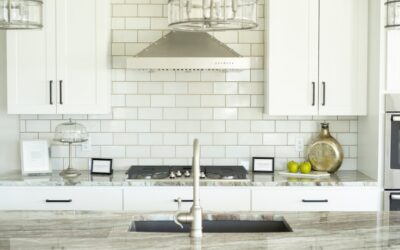
While white will never go out of style, subway tile has grown up. Try a full-height installation that runs tile from counter to the underside of the upper cabinets, or carry it all the way to the ceiling behind a range for a bold focal wall. Colored glaze in sage green, soft blush, or deep charcoal adds personality without abandoning the shape’s classic bones. Beveled-edge tiles catch light for extra dimension, and a single row of a contrasting accent tile can act as a subtle border.
Estimating How Much Tile to Buy
Running short mid-project is a headache, especially if the tile is from a dye lot that gets discontinued. Measure the area to be tiled by multiplying the width of each wall section by its height, then subtract the square footage of windows and any area hidden behind appliances that will not be tiled. Add the sections together for your net square footage.
Then pad the number. Buy 10% extra for a simple running bond or stacked layout to cover cuts and the occasional cracked tile, and bump that to 15% or even 20% for a diagonal or herringbone pattern, which generates far more offcuts. Keep a few leftover tiles from the same lot after the job; a future repair with a slightly off-color replacement will always stand out against the original field.
Dealing With Outlets and Edges
The trickiest cuts on any backsplash happen around electrical outlets, and getting them clean separates a polished job from an obvious DIY one. Before you tile, shut off the power and unscrew the outlets so you can pull them forward. Once the tile is set, the receptacle should sit proud of the new surface, which is why code calls for spacer screws or an outlet extender to bring the box flush with the finished tile face.
For the cuts themselves, mark the outline on the tile and nibble the opening with tile nippers, or make relief cuts with an angle grinder fitted with a diamond blade. The cover plate will hide small imperfections, so aim for a snug fit rather than perfection. At the ends of a run where tile meets open wall, finish with a bullnose edge tile, a metal Schluter trim strip, or a neat caulk line so no raw, unglazed edge is left exposed.
Keeping It Looking New
Maintenance is refreshingly simple. Wipe the glazed surface with a soft cloth and mild dish soap, avoiding abrasive pads that can dull the finish. Reseal cement grout once a year in the splatter zone if you did not use epoxy. Address any cracked caulk at the countertop seam promptly to keep water out of the wall. Do that little bit of upkeep and a well-installed subway tile backsplash will still look sharp long after the rest of your kitchen is due for a refresh, delivering one of the best returns on a weekend of effort you can find in home improvement.
Prefer to explore on your own?
See how new flooring looks in your actual room in seconds — free, no signup.
Try the free Floor Studio →