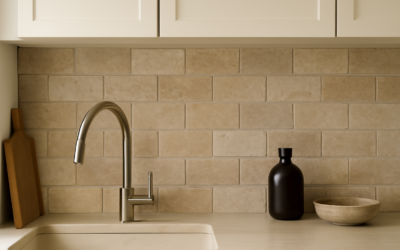
Warm, earthy, and full of natural movement, travertine has anchored beautiful kitchens for centuries, and it still delivers a timeless look that manufactured tile struggles to match. Planning a travertine backsplash kitchen means embracing a genuine natural stone with all its character, from the soft beige and honey tones to the tiny pits and swirls that make each piece unique. I’ve installed a lot of travertine over the years, and while it’s one of the most gorgeous options behind a counter, it also demands respect when it comes to sealing and care. Here’s the complete picture.
Part of our Kitchen Remodeling guide — explore the full guide →
- What Travertine Actually Is
- Finishes and How They Change the Look
- Layout and Design Options
- Sealing Is Non-Negotiable
- What a Travertine Backsplash Kitchen Costs
- Pros and Cons to Weigh
- Cleaning and Daily Care
- How Travertine Compares to Other Options
- Tips for a Lasting Travertine Install
- Frequently Asked Questions
- Is Travertine the Right Backsplash for You?
What Travertine Actually Is
Travertine is a form of limestone that forms around mineral springs, which gives it that distinctive porous texture and its warm, banded coloring. It falls in the middle of the hardness scale, softer than granite or porcelain but plenty durable for a vertical backsplash that never takes foot traffic. The natural pits in its surface can be left open for a rustic look or filled at the factory for a smoother finish.
Colors range from creamy ivory and soft beige through golden honey to walnut and even silvery gray. Because every slab is cut from natural stone, expect variation from tile to tile, which is part of the appeal but means you should dry-lay pieces before setting them to blend the coloring.
Finishes and How They Change the Look
Travertine comes in several finishes, and the one you choose sets the entire tone of the kitchen.
- Tumbled — soft, rounded edges and a matte, aged surface. The most rustic and forgiving, ideal for Tuscan and farmhouse kitchens.
- Honed — smooth and matte with crisp edges. A clean, versatile look that suits transitional and modern-traditional spaces.
- Polished — glossy and reflective, showing the stone’s veining at its richest. More formal, though it shows water spots more readily.
- Brushed — lightly textured with a subtle sheen, a middle ground between honed and tumbled.
For a backsplash, tumbled and honed are the most popular. Tumbled travertine in a 4×4 or a versailles pattern gives that classic old-world kitchen feel, while honed slabs or large-format tile lean cleaner and more contemporary.
Layout and Design Options
Travertine’s versatility shows in the range of layouts it supports. A running-bond of subway-shaped travertine reads clean and current. A traditional 4×4 grid feels classic. For something more distinctive, the versailles or French pattern combines four different tile sizes into a repeating, seemingly random layout that showcases the stone beautifully.
Mosaic sheets of small travertine chips, often mixed with glass or metal accent tiles, make an easy DIY-friendly option that still delivers the natural stone look. Whatever pattern you choose, keep grout joints tight and blend tiles from several boxes as you go, so no single dark or light piece stands out awkwardly.
Sealing Is Non-Negotiable
Here’s the part that trips up homeowners. Travertine is porous and reactive, which means it will stain from oil, wine, coffee, and tomato, and it will etch, developing dull spots, from anything acidic like lemon juice or vinegar. In a kitchen, all of those splash onto a backsplash regularly.
The solution is diligent sealing. Apply a quality penetrating stone sealer before grouting so the porous surface doesn’t soak up grout pigment, then seal again after the grout cures. From there, plan to reseal every 12 to 18 months, or whenever water stops beading on the surface. A well-sealed travertine backsplash resists most everyday splatter, but you still need to wipe spills promptly. Never clean it with acidic or abrasive products, only a pH-neutral stone cleaner.
What a Travertine Backsplash Kitchen Costs
Travertine sits in the mid-range for natural stone, more than basic ceramic but generally less than marble. Material pricing runs about:
- Tumbled 4×4 and mosaic tile: $5 to $12 per square foot
- Honed field tile: $7 to $15 per square foot
- Large-format or premium-grade slabs: $12 to $25 per square foot
Professional installation adds $12 to $22 per square foot, with intricate patterns like versailles pushing toward the top because of the extra layout time. A typical 30 square-foot backsplash in tumbled travertine lands around $700 to $1,300 installed. Budget another $40 to $60 for quality sealer and plan on reapplying it over the years, since ongoing sealing is a real, if modest, cost of ownership with this stone.
Pros and Cons to Weigh
Travertine is a beautiful choice, but it’s not the right fit for every household. Weigh both sides honestly.
Advantages
- Warm, timeless, genuinely natural appearance no printed tile can fully replicate
- Wide range of tones and finishes to suit rustic through transitional kitchens
- Durable enough to last decades on a vertical surface when maintained
- Adds real-stone value and appeal that many buyers respond to
Drawbacks
- Porous and acid-sensitive, so it stains and etches without diligent sealing
- Requires ongoing maintenance most manufactured tiles don’t
- Color and pit variation can look uneven if tiles aren’t blended carefully
- Softer surface can chip at edges from a hard impact
Cleaning and Daily Care
Living with travertine is easy once you adjust your cleaning habits. Wipe the backsplash with a soft cloth and a stone-safe, pH-neutral cleaner, and dry it to avoid water spots on polished finishes. Skip the all-purpose sprays, vinegar solutions, and abrasive pads, all of which will dull or etch the stone over time. Blot spills like wine and cooking oil right away rather than letting them sit.
Keep an eye on your sealer’s performance with the water test: drip a little water on the surface, and if it soaks in and darkens the stone rather than beading up, it’s time to reseal. Stay on top of that simple check and the backsplash will keep its warm glow indefinitely.
How Travertine Compares to Other Options
It helps to see where travertine sits next to the backsplash materials you’re likely weighing against it. Compared with marble, travertine is more affordable and its warm tones and matte finishes hide etching better, though marble offers more dramatic veining. Against granite, travertine is softer and more porous, so it needs more sealing, but it brings a warmer, more rustic character that granite’s speckled polish can’t.
Versus porcelain stone-look tile, the trade-off is authenticity for convenience. Porcelain never needs sealing, resists stains and etching completely, and costs less to maintain, but even the best printed tile repeats its pattern and lacks the true depth of natural stone. If genuine material and a stone that ages gracefully matter most to you, travertine wins. If a carefree surface tops your list, porcelain is the smarter buy.
Tips for a Lasting Travertine Install
A few habits separate a travertine backsplash that stays beautiful from one that disappoints. Buy 15 percent extra tile from a single lot and dry-lay pieces before setting, shuffling them so light and dark tiles distribute evenly rather than clustering. Blend from several boxes as you go.
- Seal every tile before grouting so the porous stone can’t absorb grout pigment.
- Use a non-acidic, stone-appropriate grout and pack the joints fully, especially with tumbled tile that has open, rounded edges.
- Wipe grout haze promptly with clean water and a soft sponge, never an acidic haze remover on travertine.
- Apply a second coat of penetrating sealer once the grout has fully cured, then set a reminder to reseal every 12 to 18 months.
Frequently Asked Questions
Does a travertine backsplash need to be sealed behind the stove?
Absolutely, and that zone gets the most abuse. Grease, tomato splatter, and heat all hit the wall behind the range, so keep that section especially well sealed and wipe it down after cooking. Some homeowners install a glass or metal panel directly behind the burners for extra protection while keeping travertine across the rest of the wall.
Can I install a travertine backsplash myself?
Yes, particularly with mesh-mounted mosaic sheets that speed up layout. Budget extra time for pre-sealing, careful tile blending, and full grout packing on tumbled edges. If you’re comfortable using a wet saw and working methodically, a 30-square-foot backsplash is a realistic weekend DIY project.
How long does a travertine backsplash last?
Decades. On a vertical surface that never takes foot traffic, well-maintained travertine easily outlives the rest of a kitchen remodel. The stone itself is essentially permanent; only the sealer needs periodic renewal every 12 to 18 months.
Is Travertine the Right Backsplash for You?
A travertine backsplash kitchen is a wonderful choice for homeowners who love natural materials and the warm, old-world character travertine brings, and who are willing to seal and clean it with a little care. It shines in Tuscan, farmhouse, and transitional designs, and its range of finishes means it can lean rustic or refined. If you cook heavily, spill often, and want a truly worry-free surface, a porcelain stone-look tile might serve you better. But if authentic stone and timeless warmth top your list, and you’ll commit to the sealing routine, travertine rewards you with a backsplash that only looks better with age.