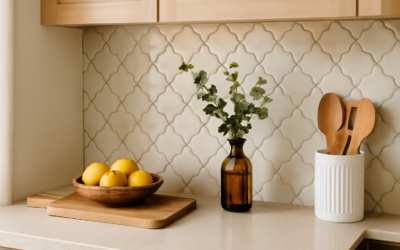
An arabesque tile backsplash brings movement and elegance to a wall that a plain subway grid simply cannot match. With its interlocking lantern or ogee shape, the arabesque pattern softens hard kitchen lines and adds a touch of Old-World romance that reads equally well in modern and traditional spaces. It is one of the easiest ways to make a backsplash feel custom and intentional.
Part of our Kitchen Remodeling guide — explore the full guide →
The shape dates back centuries to Moorish and Mediterranean design, but it has surged in popularity for good reason. The curves catch light, create rhythm, and turn an ordinary kitchen wall into a focal point.
What Makes Arabesque Tile Distinct
The silhouette is everything. Unlike square or rectangular tile, arabesque tiles have a curved, pinched-waist shape, often called lantern, ogee, or fleur depending on the exact profile. The tiles interlock so the curves flow continuously across the wall, with no straight grout grid to break the eye.
That continuous flow is the design payoff. The pattern feels organic and handcrafted even when the tiles are machine-cut. Pair a glossy glaze with a contrasting grout and the curves pop; choose a tone-on-tone grout and the effect turns soft and seamless. Either way, the shape does the heavy lifting.
Material Options
Arabesque tile comes in a range of materials, each with its own look and upkeep. Match the material to the room and your tolerance for maintenance.
- Ceramic and porcelain — The most popular and practical, available in countless glazes, easy to clean, and budget-friendly.
- Glass — Luminous and reflective, brightening small kitchens, though it shows water spots more readily.
- Marble and natural stone — Luxurious veining and depth, but porous and needing sealing.
- Cement tile — Rich matte color and a handmade feel, also porous and best sealed.
- Mosaic mesh sheets — Small arabesque pieces mounted on backing for faster installation.
Choosing Color and Finish
Color sets the mood as much as shape. Crisp white arabesque is the timeless default, brightening the room and pairing with any cabinet color. Soft grays and greiges feel calm and contemporary. Deep blues, greens, and black make a bold statement against light counters.
Finish changes the personality too. Glossy glazes reflect light and wipe clean easily, ideal behind a stove. Matte and honed finishes feel softer and more organic but may need more attention to keep grout lines clean. For grout, a shade close to the tile keeps things subtle, while a contrasting grout emphasizes every curve, so decide how much you want the pattern to shout before you buy.
Planning the Layout
A little planning prevents awkward results. Because arabesque tiles interlock, the pattern needs room to flow, so dry-lay a section on the floor or counter first to see how the curves meet your edges, outlets, and cabinet ends.
Find the center of your main wall and work outward so cut tiles land symmetrically at the edges rather than leaving a sliver on one side. Map outlet and switch locations in advance; cutting clean curves around a box takes patience. Where the backsplash meets upper cabinets or ends mid-wall, plan how the curved edge will terminate, since arabesque does not end in a clean straight line the way subway tile does. Many homeowners use a pencil-trim or bullnose piece to finish exposed edges.
Installation Basics
The process follows standard tile practice with a few shape-specific tweaks. Start with a clean, flat, primed wall. Spread thin-set with a notched trowel over a small area, set the tiles into the interlocking pattern, and use tile spacers or the tile’s built-in lugs to keep grout lines even.
Cutting curves is the trickiest part. A wet saw handles straight cuts, but you will need tile nippers, an angle grinder with a diamond blade, or a rotary tool for the curved cuts around outlets and edges. Work slowly and wear eye protection. After the thin-set cures, usually 24 hours, grout the joints, wipe off the haze, and seal natural stone or cement tile per the manufacturer’s instructions. If your wall is large or you are working with pricey marble, hiring an experienced tile setter is money well spent.
What an Arabesque Backsplash Costs
Budget varies widely with material and labor. Treat these as estimates:
- Ceramic and porcelain arabesque tile: $8 to $20 per square foot
- Glass and premium ceramic: $15 to $35 per square foot
- Marble, stone, and cement tile: $20 to $50 per square foot
- Professional installation: $40 to $80 per square foot labor, depending on complexity
The curved cuts and interlocking layout make arabesque a bit more labor-intensive than basic subway tile, which can nudge installation costs higher. For a standard kitchen backsplash of 30 square feet, plan accordingly and buy 10 to 15 percent extra tile for cuts and future repairs.
Cleaning and Long-Term Care
Upkeep is straightforward with the right habits. Wipe glazed ceramic, porcelain, and glass with a soft cloth and mild cleaner; the smooth surface releases grease easily. Avoid abrasive pads that can scratch the glaze.
Natural stone and cement arabesque need more attention. Reseal them periodically following the manufacturer’s schedule, and skip acidic cleaners like vinegar that etch marble. Keep grout lines clean with a soft brush and a gentle grout cleaner, and reapply grout sealer every year or two in busy kitchens. Cared for properly, an arabesque tile backsplash stays a striking centerpiece for the life of the kitchen.
Design Ideas and Pairings
The arabesque shape plays well with a range of styles, so let the rest of the kitchen guide your choices. In a transitional kitchen, white arabesque with shaker cabinets and brass hardware strikes a timeless balance. For a coastal or farmhouse feel, soft blue or seafoam tiles add personality without overwhelming the room. A glossy black or deep navy arabesque against light counters reads dramatic and modern.
Think about scale relative to your wall, too. Larger arabesque tiles make a bold statement and install faster, while smaller mosaic versions add intricate texture and suit compact backsplashes or bathroom accent walls. Running the pattern as a full-height backsplash behind the range, from counter to hood, creates a built-in focal point that draws the eye and anchors the whole kitchen.
Prefer to explore on your own?
See how new flooring looks in your actual room in seconds — free, no signup.
Try the free Floor Studio →