Few materials bring the outdoors inside quite like a river of smooth stones set behind your range. A pebble backsplash turns a flat wall into something you actually want to touch, and it pairs just as easily with a rustic farmhouse kitchen as it does with a spa-style bathroom. But those rounded stones behave differently than a slick subway tile, and knowing what you are getting into before you buy saves you from grout headaches and a wall that never quite looks finished. Here is what a working installer wants you to understand first.
Part of our Kitchen Remodeling guide — explore the full guide →
What a Pebble Backsplash Actually Is
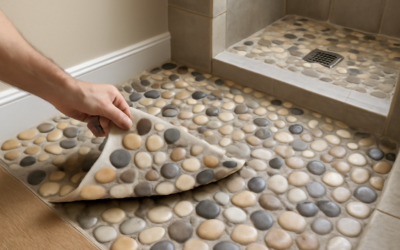
Most pebble backsplashes sold today are not loose stones you glue on one at a time. They come as 12-inch mesh-backed sheets, with dozens of tumbled pebbles already arranged and bonded to a flexible fiberglass or nylon net. You buy them by the square foot, line the sheets up on the wall, and the seams disappear into the natural gaps between stones. This is the same format used for pebble shower floors, which is why you will often find the two products sitting side by side at the tile counter.
The pebbles themselves range from true river rock to sliced “flat” pebbles that sit almost level against the wall. Flat or “standing” pebbles are the smart pick for a backsplash because they give you a shallower profile, roughly a quarter inch of relief instead of a full inch, so the surface is far easier to wipe down. Fully rounded rock looks dramatic but collects grease and food splatter in every crevice, which is a real problem directly behind a cooktop.
Popular Styles and Color Families
Color drives the whole look. Warm tan and honey mixes read cozy and traditional, while cool gray and charcoal blends lean modern and industrial. Bright white marble pebbles feel clean and coastal, though they show hard-water spots faster than darker stone. If you want a seamless natural tone, buy an extra sheet or two so you can cull any stones that clash and swap them into a less visible spot near the counter.
- Sliced sea-green pebble — flat-cut stones with a soft blue-green cast, excellent for coastal and bathroom vanities
- Black polished pebble — high-contrast, glossy, and modern, but it magnifies water spots
- Multicolor river blend — the classic tan-brown-gray mix that hides splatter well
- White marble pebble — bright and airy, best paired with a good sealer
Cost: What You Will Actually Pay
Materials for a pebble backsplash typically run $8 to $18 per square foot for the mesh sheets, with premium sliced-marble blends climbing toward $20 or more. A standard kitchen backsplash covers about 30 square feet, so figure $250 to $550 in stone before adhesive, grout, and sealer. Those extras add roughly $60 to $120 for a mid-size job. If you hire a tile setter, labor for pebble work runs higher than flat tile because the stones take longer to grout and clean, often $12 to $20 per square foot installed on top of materials. Budget $900 to $1,400 for a professionally installed 30-square-foot kitchen backsplash, and a bit less for a small bathroom accent wall.
How to Install a Pebble Backsplash
This is a project a patient DIYer can handle in a weekend, but respect that pebbles are less forgiving than square tile. Start with a clean, primed, and completely flat wall. Use a white polymer-modified thinset or a premium acrylic mastic rated for stone, spread with a 3/16-inch V-notch trowel. White adhesive matters because gray thinset can show through the gaps and muddy your grout color.
- Dry-lay several sheets on the counter first and blend stones between sheets so no two identical clusters sit next to each other.
- Comb adhesive onto a small section, press each sheet firmly, and use a grout float to push the stones into full contact so none sit proud.
- Cut sheets with heavy scissors through the mesh, and fill outlet gaps by hand-placing loose pebbles.
- Let the adhesive cure 24 hours before grouting.
Grouting is where pebble jobs are won or lost. Because there is so much surface area and so many deep joints, use a sanded grout and plan for two full passes plus extra cleanup. Work the grout deep into every gap, then sponge repeatedly with clean water, changing the bucket often. Expect a stubborn haze that needs a second-day buffing.
Sealing and Long-Term Care
Natural stone is porous, so sealing is not optional in a kitchen. Apply a penetrating stone sealer before you grout to keep grout from staining the pebbles, then apply a second coat over the finished, grouted surface. A quality sealer costs $20 to $35 a bottle and should be refreshed every one to two years in a high-splatter zone. For a bathroom backsplash that only sees the occasional water splash, one reseal every couple of years is plenty.
Day-to-day cleaning is simple: wipe with a soft cloth and a pH-neutral stone cleaner. Skip vinegar, lemon, and harsh bathroom sprays, all of which etch calcium-based stone like marble over time. For grease behind the range, a little dish soap in warm water and a soft nylon brush lifts buildup out of the joints without scratching the polish.
Pebble Backsplash Versus Other Textured Options
It helps to know how a pebble backsplash stacks up against the alternatives before you commit. Compared with glass mosaic, pebble delivers far more depth and a natural, organic pattern that never looks manufactured, but glass wipes clean in seconds and needs no sealing. Against a stacked-stone ledger panel, pebble is smoother and gentler on the eye, and it costs less per square foot to install because you are not wrestling with heavy, thick stone strips. If you love texture but worry about upkeep, a middle path is a porcelain tile printed to mimic river rock. It gives you the visual without the porous surface, though it lacks the genuine hand-touched feel that makes real pebble special. Most homeowners who choose true stone do so precisely because nothing synthetic captures that tumbled-river character, and they accept the extra sealing as a fair trade.
Common Mistakes to Avoid
A handful of predictable errors ruin otherwise good pebble installations. The first is using gray thinset that ghosts through the gaps and dulls the grout color, so always spring for white adhesive. The second is under-grouting, leaving voids deep between stones where moisture and grime collect; pack the joints fully on the first pass. The third is skipping the pre-grout sealer, which lets grout haze permanently stain the porous stone faces. Finally, resist the urge to install pebble over a wavy or unprimed wall, because even though the texture hides minor imperfections, poor adhesion behind a heavy stone sheet leads to tiles releasing over time. Take the extra hour on prep and sealing and this backsplash will look showroom-fresh for many years.
Is a Pebble Backsplash Right for Your Space
A pebble backsplash rewards you with texture and warmth that flat tile simply cannot match, and it is forgiving of a slightly imperfect wall because the uneven surface hides minor waviness. The trade-offs are real, though: more grout, more sealing, and more cleaning effort than glass or ceramic. If you cook heavily with oil every night, consider using pebble as an accent band or a bathroom feature rather than the full range wall, and pair it with an easy-wipe tile where splatter is worst. Used thoughtfully, it is one of the most distinctive and affordable natural-stone looks you can add to a home.