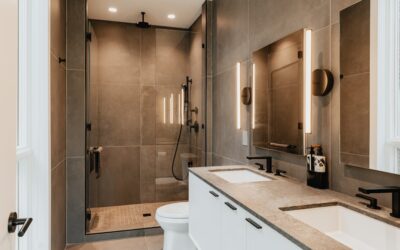
Tile has ruled bathroom and kitchen walls for generations, but a growing number of homeowners are choosing large-format slabs instead. Quartz wall panels are big sheets of engineered stone installed vertically on walls to create a smooth, nearly seamless surface with little or no grout. From spa-like shower enclosures to dramatic full-height backsplashes, they deliver a clean, high-end look that’s hard to achieve with small tiles.
Part of our Countertops guide — explore the full guide →
Having installed both tile and slab cladding, I can tell you the difference in feel is significant. A wall of engineered quartz reads as one continuous plane, which makes a room look larger and far easier to keep clean. Here’s what you need to know before deciding whether this approach fits your project and budget.
What Quartz Wall Panels Are
These panels are the same engineered quartz used for countertops, roughly 90 to 93 percent ground natural quartz bound with resins and pigments, but cut and finished for vertical wall use. Because the material is non-porous, it works beautifully in wet areas where traditional grout would eventually stain, crack, or harbor mildew.
Panels are typically fabricated from standard slabs, often around 120 by 55 inches, and cut to fit your wall dimensions. In a shower, that can mean covering an entire wall with a single sheet or just two or three pieces, dramatically reducing seams compared to dozens of individual tiles.
Common Uses Around the Home
Large-format engineered stone cladding is versatile, and I see it applied in several high-impact areas.
- Shower walls: the flagship application; grout-free, waterproof, and easy to squeegee clean.
- Kitchen backsplashes: full-height slabs behind the range eliminate grout lines and can match the counter.
- Accent walls: a fireplace surround or feature wall in a marble-look pattern becomes a focal point.
- Tub surrounds: a clean, continuous look around a soaking tub.
- Wainscoting and vanity walls: partial-height panels that add richness to powder rooms.
Quartz Panels vs. Tile
The tile-versus-slab decision comes down to look, maintenance, and budget. Both are durable, but they behave very differently day to day.
Where Panels Win
- Fewer seams: a near-seamless surface instead of a grid of grout lines.
- Easier cleaning: no grout to scrub, seal, or watch for mildew.
- Modern look: continuous veining and large planes feel upscale.
- Waterproofing: fewer joints mean fewer places for water to sneak through.
Where Tile Wins
- Lower material cost: ceramic and porcelain tile are cheaper per square foot.
- Easier repairs: a cracked tile can be swapped; a damaged panel usually can’t.
- DIY friendly: tile is far more forgiving for a handy homeowner.
- Design flexibility: patterns, mosaics, and shapes tile can’t be beaten on.
Pros and Cons
Advantages
- Sleek, seamless appearance that makes spaces feel larger.
- Non-porous and grout-free, so cleaning is quick and mildew has nowhere to grow.
- Consistent color and pattern from panel to panel.
- Durable and scratch-resistant surface that holds up in daily use.
Drawbacks
- Higher upfront cost than most tile, both material and labor.
- Heavy panels require professional handling and solid wall framing.
- Limited heat tolerance, so keep panels away from direct flame near fireplaces.
- Damage typically means replacing a whole panel rather than a small section.
Installation Overview
This is not a typical weekend DIY job. The panels are heavy, unforgiving to cut on-site, and require precise templating. Most installations follow a similar sequence, and I always recommend a qualified stone fabricator or installer.
- Templating: the installer measures and creates a precise template of each wall, accounting for niches, valves, and outlets.
- Fabrication: panels are cut and any cutouts are made at the shop with proper equipment.
- Wall prep: the substrate is checked for flatness and, in showers, properly waterproofed.
- Setting: panels are bonded with construction adhesive and thin-set as specified, then leveled and braced while they cure.
- Sealing joints: the few seams and any corners are filled with color-matched silicone rather than grout.
Wall flatness is the make-or-break detail. Large panels telegraph any hump or dip in the wall, so a good installer will shim, float, or skim the substrate flat before setting anything.
Cost and What to Budget
Expect installed pricing roughly in the range of $60 to $120 per square foot depending on panel pattern, wall complexity, and your local labor market. That’s a premium over tile, but it buys a look and low-maintenance surface that tile can’t fully match.
Sample Budget
- Material: $35 to $70 per sq ft for the slab.
- Fabrication and install: $25 to $50 per sq ft.
- A standard shower with roughly 90 to 120 sq ft of wall often runs $5,000 to $12,000 installed.
- A full-height kitchen backsplash of 25 to 35 sq ft commonly lands between $1,800 and $4,000.
Prices climb with heavily veined marble-look patterns and drop with simpler solid colors, so pattern choice is a real lever on your total.
Care and Maintenance
Upkeep is one of the biggest selling points. Because the surface is non-porous, it never needs sealing, and there’s no grout to scrub. In a shower, a quick squeegee after use and an occasional wipe with a mild soap-and-water solution keep the panels looking new. Avoid abrasive pads and harsh chemicals like bleach and oven cleaner, which can dull the finish over time.
Choosing the Right Panel for Your Project
Not every wall calls for the same approach, so match the panel to the room and how it will be used. In a busy family shower, a subtle marble-look or a solid tone hides water spots and daily use better than a stark bright white. For a statement fireplace or entry wall, a bold, heavily veined pattern earns its keep as a focal point.
Think about the finish, too. A polished surface reflects light and looks luxurious but shows fingerprints and water marks more readily, while a honed or matte finish is more forgiving and reads as contemporary. Order a large sample and view it in the actual room under your real lighting before committing, because patterns look very different under warm kitchen lights than under cool bathroom fixtures.
Quick Selection Guide
- Small bathroom: light solid or soft marble-look to open up the space.
- Statement wall: dramatic veining or bookmatched panels.
- High-traffic shower: mid-tone or matte finish to hide spots.
- Kitchen backsplash: a pattern that coordinates with, but doesn’t exactly copy, the counter.
How Long Installation Takes
For a single shower or backsplash, the fabrication-and-install timeline usually runs one to two weeks from templating to final set. The on-site portion is quick, often a day, but the panels must be cut and any niches or valve holes made at the shop first. Plan for the wall to be out of use for a couple of days while adhesives and silicone cure fully before you expose them to water.
Frequently Asked Questions
Can quartz wall panels be used in a shower?
Yes. Their non-porous, grout-free surface makes them one of the best options for shower walls, as long as the substrate is properly waterproofed and the panels are professionally installed.
Are they cheaper than tile?
No. Both material and labor cost more than most tile. You pay a premium for the seamless look and reduced maintenance.
Do they need sealing?
No. Engineered quartz is non-porous and never requires sealing, which is a major advantage over natural stone and grouted tile.
Can I install them myself?
It’s not recommended. The panels are heavy, expensive, and require precise templating and cutting, so professional installation is the safe choice.
The Bottom Line
For a bathroom or kitchen wall that looks luxurious and practically cleans itself, quartz wall panels are hard to beat. You trade a higher upfront cost and the need for professional installation for a seamless, grout-free, non-porous surface that stays beautiful with almost no effort. If a spa-quality shower or a showpiece backsplash is on your wish list, this material earns its place in the plan.