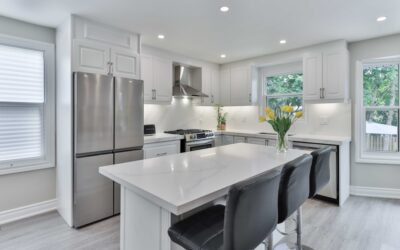
The biggest money mistake in a small kitchen is moving things that did not need to move. When you renovate small kitchen spaces, relocating a sink or range can swallow a quarter of the budget before a single cabinet arrives, while the same money spent on smarter storage and better lighting would change how the room works every day. Small kitchens reward planning more than any other room, because every inch and every dollar shows.
Part of our Kitchen Remodeling guide — explore the full guide →
The short plan: measure everything, decide early whether the layout stays or changes, design storage before you pick finishes, choose appliances sized for the space, then follow a strict order of work so trades are not tripping over each other. A realistic budget split puts the largest share into cabinets and installation, with a contingency of 10 to 20 percent held back for surprises behind the walls.
- How to Renovate Small Kitchen Spaces: Start With Measurements and Goals
- Keep the Layout or Change It?
- Plan Storage Before Finishes
- Size Appliances for the Space
- Order of Work: The Renovation Sequence
- How to Split the Budget
- General Cost Ranges
- Troubleshooting Common Small-Kitchen Problems
- When to Call a Licensed Professional
- Frequently Asked Questions
This guide walks through each decision in the order you should make it, from layout to the final punch list, with notes on permits and when licensed trades are required.
How to Renovate Small Kitchen Spaces: Start With Measurements and Goals
Before sketching anything, measure the room wall by wall in inches, including ceiling height, window and door positions, trim widths, and the exact centerlines of the sink drain, water supply, gas line, range outlet, and every electrical outlet and switch. Note which walls are exterior and where the vent for the range hood could exit.
Then list what is not working. Common complaints in small kitchens are too little counter space between the sink and range, upper cabinets you cannot reach, no place for small appliances, poor lighting, and a refrigerator door that blocks the walkway. Rank these. Your top three problems should drive every design choice that follows.
Finally, set a firm budget number and decide how long you can live without a working kitchen. A cosmetic refresh might take one to two weeks; a full gut with new cabinets typically runs six to twelve weeks once lead times are included.
Keep the Layout or Change It?
This is the decision that sets your budget. Keeping the sink, range, and refrigerator in their current locations means plumbing, gas, and electrical rough-ins stay put, and new cabinets simply replace old ones in the same footprint.
Reasons to keep the existing layout
- The work triangle between sink, range, and refrigerator already functions, with each leg roughly 4 to 9 feet.
- Your budget is modest and you would rather spend on cabinets, counters, and flooring.
- The range is on an exterior wall that allows a ducted hood.
Reasons to change it
- There is no usable prep counter, ideally at least 24 to 36 inches of continuous space between the sink and cooktop.
- Doors collide: the dishwasher, oven, and refrigerator cannot open at the same time.
- A wall could be opened to a dining area to borrow light and space.
Moving plumbing, gas, or electrical lines requires licensed trades and permits in most jurisdictions. Removing or altering a wall is a bigger step: it may be load-bearing, and it may hide ducts, plumbing vents, or wiring. Have a structural engineer or experienced contractor evaluate any wall before it comes out, and pull the required permit.
Plan Storage Before Finishes
Storage is where a small kitchen renovation earns its keep. When you renovate small kitchen layouts, every cabinet box should justify its footprint. Design it before you fall in love with a countertop color.
- Take uppers to the ceiling. Standard 30-inch uppers leave a dust shelf above them. Going to 36- or 42-inch uppers, or adding a stacked row, gains seasonal storage without using floor space.
- Swap base doors for drawers. Deep drawers of 24 to 36 inches wide hold pots and dishes far more efficiently than shelves behind doors.
- Use the corners. Blind-corner pull-outs or a lazy susan recover space that is otherwise lost.
- Add narrow pull-outs. A 6- to 9-inch filler beside the range can become a spice or oil pull-out.
- Consider a pantry cabinet. A single 18- to 24-inch-wide tall cabinet with roll-out shelves can replace a whole wall of uppers.
- Toe-kick drawers. The 4-inch space under base cabinets can hold sheet pans and cutting boards.
- Rail systems and open shelving. A short run of open shelves or a wall rail keeps daily items reachable while making the room feel less boxed in.
Size Appliances for the Space
Full-size appliances are not always the right answer in a small kitchen. Compact and counter-depth models free up inches that matter.
- Refrigerator: A counter-depth unit sits roughly flush with 24-inch-deep cabinets instead of protruding several inches into the walkway. Narrow 24- to 30-inch-wide models exist for tight spaces.
- Range or cooktop: A 24-inch range can free a foot of counter compared to a 30-inch model. Weigh how often you cook for a crowd before downsizing.
- Dishwasher: An 18-inch dishwasher saves 6 inches over a standard 24-inch unit, useful when every base cabinet counts.
- Microwave: An over-the-range combination saves counter space but may vent poorly. A drawer microwave in a base cabinet is another option.
- Ventilation: Ducted hoods vent outdoors and are generally more effective than recirculating ones. Plan the duct route before cabinets are ordered.
Choose appliances before finalizing cabinet drawings. Cabinet boxes are built around exact appliance dimensions, and a late change can force expensive reorders.
Order of Work: The Renovation Sequence
Following the right sequence prevents damage to new finishes and keeps inspections on schedule.
- Design and permits. Finalize drawings, order cabinets and appliances (lead times can run weeks), and apply for permits where required.
- Set up a temporary kitchen. A folding table, microwave, electric kettle, and a utility sink or bathroom sink will carry you through demolition.
- Demolition. Remove cabinets, counters, appliances, and flooring as planned. Turn off water, gas, and power to affected circuits first, and have licensed trades disconnect gas and hardwired appliances.
- Structural work and framing. Any wall changes, new headers, or blocking for upper cabinets happen now, with engineer or contractor oversight where needed.
- Rough-in plumbing, gas, and electrical. Licensed trades run new lines, circuits, and outlets. Rough-in inspections usually happen before walls are closed.
- Drywall, patching, and primer. Close the walls, tape, mud, sand, and prime.
- Flooring. Many installers lay flooring before cabinets for a continuous surface; floating floors are often installed after cabinets so the floor is not pinned down. Confirm with your flooring manufacturer.
- Cabinets. Install uppers first, then bases, leveled and shimmed.
- Countertops. Stone and quartz fabricators template after bases are installed, then return to install, often one to three weeks later.
- Backsplash, fixtures, and appliances. Tile the backsplash, then install sink, faucet, lighting, and appliances. Final inspections follow.
- Paint and punch list. Final paint, hardware, caulk, and adjustments.
How to Split the Budget
Every kitchen differs, but homeowners who renovate small kitchen rooms tend to land on similar proportions. A typical small kitchen renovation budget breaks down roughly like this:
| Category | Approximate share |
|---|---|
| Cabinets and hardware | 30 to 35 percent |
| Labor and installation | 15 to 25 percent |
| Appliances | 10 to 15 percent |
| Countertops | 10 to 15 percent |
| Plumbing, electrical, and lighting | 5 to 10 percent |
| Flooring, backsplash, and paint | 5 to 10 percent |
| Contingency | 10 to 20 percent |
Small kitchens have an advantage here: because square footage is low, you can often afford a better countertop or flooring material than you would in a large room. A 30-square-foot countertop in quartz may cost less than a much larger run of laminate in a big kitchen.
General Cost Ranges
Costs depend heavily on region, materials, and scope. As a broad guide, a cosmetic refresh with paint, new hardware, lighting, and a backsplash sits at the low end, often a few thousand dollars. A mid-range remodel that keeps the layout but replaces cabinets, counters, flooring, and appliances commonly falls into the tens of thousands. Relocating plumbing and gas, removing walls, or choosing custom cabinetry pushes the total higher. Get at least three itemized quotes so you can compare labor and material separately.
Troubleshooting Common Small-Kitchen Problems
- Room feels cramped after install: Keep walkways at least 36 inches wide, and 42 inches where two cooks work. Light cabinet colors, reflective backsplash tile, and good under-cabinet lighting help the room read larger.
- Not enough outlets: Plan outlets along every counter run during rough-in; adding them later means opening finished walls.
- Doors and drawers hit each other: Check corner clearances on the drawings and use filler strips so handles clear.
- Grease and odors linger: A ducted hood sized to your cooktop, vented outside, solves most ventilation complaints.
- Budget creep: Lock in selections before demolition. Changes mid-project cost the most.
When to Call a Licensed Professional
Homeowners can handle design, demolition of non-structural items, painting, and often cabinet and backsplash installation. Call licensed pros for the rest. Moving or adding plumbing, gas, or electrical lines requires licensed trades and permits, and new circuits or hardwired lighting must be installed with the breaker off and power confirmed off with a non-contact voltage tester. Any wall removal or alteration needs a structural engineer or experienced contractor to confirm whether it is load-bearing, plus a permit. A general contractor can coordinate these trades and inspections so the sequence stays on track.
Frequently Asked Questions
What is the cheapest way to renovate a small kitchen?
Keep the existing layout and focus on paint, cabinet refacing or painting, new hardware, a new faucet, better lighting, and a backsplash. Avoiding plumbing and gas relocation is the single biggest saving.
How long does a small kitchen renovation take?
A cosmetic update might take one to two weeks. A full remodel with new cabinets and counters commonly takes six to twelve weeks, including cabinet lead times, countertop fabrication, and inspections.
Do I need a permit to renovate a small kitchen?
Cosmetic work usually does not need one, but moving plumbing, gas, or electrical lines, adding circuits, or altering walls typically does. Check with your local building department before work starts.
Should I install flooring before or after cabinets?
It depends on the floor. Tile and nail-down hardwood are often installed first; floating floors are usually installed after cabinets. Follow the flooring manufacturer’s guidance.
What makes a small kitchen feel bigger?
Cabinets to the ceiling, light colors, layered lighting, clear walkways, and fewer visual breaks, such as a continuous backsplash and matching countertop and cabinet tones, all help a small kitchen feel more open.