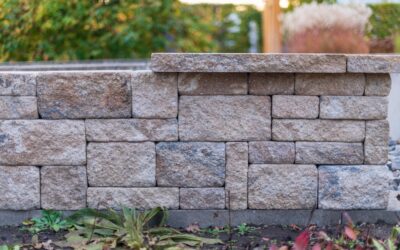
An Allan Block retaining wall is one of the most popular ways for homeowners to hold back a slope without hiring a mason or mixing a drop of mortar. The system uses interlocking concrete blocks that stack with a built-in setback and hollow cores, creating a strong, engineered wall that a determined DIYer can build over a weekend. Its combination of structural strength, a natural stone look, and forgiving assembly has made Allan Block a favorite for garden terraces, raised beds, and slope stabilization across the country. Understanding how the system works and where the critical steps lie is the difference between a wall that lasts decades and one that leans within a year.
This guide explains the Allan Block system, the all-important base preparation, cost expectations, and how to build one step by step.
How the Allan Block System Works
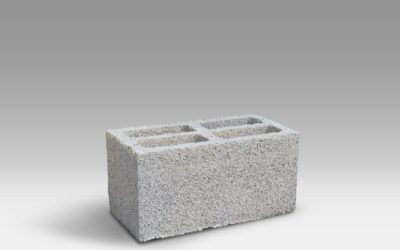
Allan Block units are hollow-core concrete blocks designed to stack without mortar, relying on their own weight, a locking geometry, and compacted gravel infill for strength. Each block has a raised lip on the back and a recessed notch, so when you set one course on top of another, the blocks automatically lock into a consistent backward setback. That built-in lean, angling into the hillside, is what lets the wall resist the pressure of the soil behind it.
The hollow cores are filled with crushed stone as you build, which adds weight, improves drainage, and ties the courses together. Because there is no mortar and no need for precise leveling of every block, the system is remarkably forgiving compared with laying brick or stone. Get the first course perfect and the interlocking design does much of the alignment work for you on every course above.
Why the Base Is Everything
If there is one rule that determines the fate of an Allan Block wall, it is this: the wall is only as good as its base. Nearly every failed segmental retaining wall traces back to a poorly prepared foundation. The base course must sit on a compacted layer of gravel in a properly excavated trench, and it must be dead level in every direction.
Start by digging a trench wide enough for the block plus room behind it, and deep enough to bury the entire bottom course below finished grade, typically 6 inches or more. Add several inches of angular crushed stone, then compact it firmly with a plate compactor or hand tamper until it stops moving. Level this base gravel meticulously; a base that is off by even a fraction telegraphs and compounds through every course above. Setting the first row of blocks perfectly level, checking front to back and side to side on each one, is the most important hour of the entire project.
Drainage: The Hidden Requirement
Like any retaining wall, an Allan Block wall must manage water, because saturated soil creates enormous pressure that will eventually push a wall out. The system is designed with drainage in mind: the gravel-filled cores and the crushed stone behind the wall create a path for water to move down and away instead of building up.
For walls taller than a couple of feet, install a perforated drain pipe at the base behind the wall, wrapped or bedded in gravel, and route it to daylight so collected water can escape. Backfill directly behind the blocks with clean crushed stone, not the native soil, for at least a foot of depth, and separate that gravel zone from the surrounding soil with landscape fabric to keep fines from clogging it. Grade the ground above the wall so surface water flows away rather than pooling against the top. Skip the drainage and even a perfectly stacked wall can fail; include it and the wall stands dry and stable.
Step-by-Step Installation
With the principles clear, the build itself follows a logical sequence that any careful DIYer can manage.
- Lay out and excavate: Mark the wall line, then dig a level trench deep enough to bury the base course and wide enough for the block plus gravel backfill.
- Build the base: Add and compact several inches of crushed stone, leveling it precisely.
- Set the first course: Place each base block, leveling front-to-back and side-to-side, and check alignment along the whole run. This course sets the standard for the wall.
- Fill and backfill: Fill the block cores with crushed stone and place gravel behind the wall, adding drain pipe if needed.
- Stack subsequent courses: Sweep debris off each course, then set the next row so the blocks lock into their setback, staggering the joints like brickwork for strength. Fill cores and backfill as you go.
- Cap the wall: Finish the top with cap blocks, secured with concrete adhesive for a clean, permanent edge.
Compacting the backfill in lifts as you rise, rather than all at once at the end, keeps the wall tight and prevents future settling behind it.
Cost of an Allan Block Wall
Cost depends heavily on whether you build it yourself or hire out. As a DIY project, Allan Block walls typically run $15 to $30 per square foot of wall face in materials, covering the blocks, base and backfill gravel, drain pipe, fabric, and caps. A modest garden wall can be a few hundred dollars in materials, while a larger slope-stabilizing wall climbs into the low thousands.
Hiring a professional installer adds labor and typically brings the total to $30 to $60 per square foot or more, depending on wall height, site access, and how much excavation and grading is required. The DIY savings are significant, which is a big part of the system’s appeal, but factor in equipment rental for a plate compactor and the physical demand of moving heavy blocks and gravel. For walls over about four feet tall, many areas require an engineer’s design and a permit, so check local codes before you build high.
Common Mistakes to Avoid
Most Allan Block failures come from a handful of avoidable errors. The biggest is rushing or skimping on the base, leaving it unlevel or poorly compacted, which dooms everything above. The second is neglecting drainage, backfilling with native soil instead of gravel, and skipping the drain pipe, which lets water pressure build until the wall bows.
Other common missteps include failing to bury the base course below grade, not staggering the block joints, and building taller than the system or local code allows without engineering. Building on a slope without stepping the base trench into level sections is another frequent error. Avoid these, respect the base and drainage steps, and an Allan Block wall rewards you with a strong, attractive barrier that holds its ground for decades.
Building Curves, Corners, and Terraces
One of the reasons the Allan Block system is so popular is its flexibility for shapes beyond a straight run, and knowing how to handle curves, corners, and stepped terraces opens up far more design possibilities in your yard. Because the blocks are relatively compact and lock by geometry rather than mortar, you can build gentle curves simply by fanning the blocks slightly on each course. The system’s design accommodates a natural radius, letting you follow the contours of a patio, a planting bed, or a driveway rather than forcing everything into rigid straight lines.
Corners and inside angles are handled with corner blocks or by trimming units to fit, and staggering the joints around the turn keeps the wall strong. For a clean 90-degree corner, many homeowners use the manufacturer’s corner blocks, which are designed to interlock at the turn and present a finished face on both sides. Splitting a block with a chisel or a masonry saw lets you fit odd lengths and keep the running bond consistent through curves and corners.
For taller slopes, terracing is often smarter and safer than one tall wall. Instead of building a single high wall that demands engineering and heavy drainage, you break the slope into two or more shorter walls stepped back from one another, with a planted bench between them. This reduces the load on any single wall, spreads the drainage demand, and creates attractive tiered planting beds. As a rule, keep each terraced wall within the height the system handles without engineering, and set the upper wall far enough back so its load does not bear directly on the one below. Terracing turns a steep, difficult grade into a series of manageable, good-looking levels, and it plays perfectly to the Allan Block system’s modular strengths.
The Takeaway
An Allan Block retaining wall gives homeowners a genuinely DIY-friendly path to a strong, good-looking wall thanks to its mortarless, interlocking design. Success hinges on two things above all: a perfectly level, well-compacted gravel base and proper drainage with gravel backfill and a drain pipe. Nail those, stack the courses with staggered joints and their natural setback, cap it cleanly, and you will have a wall that stabilizes your slope and enhances your yard for a fraction of a mason’s cost. Take your time on the base, respect the water, and the rest of the job is simply stacking blocks.