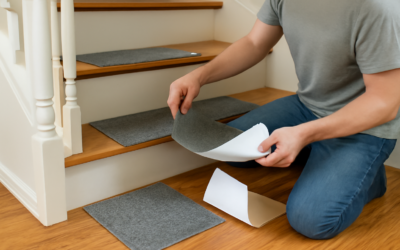
For renters, basements, and weekend DIYers, stick on carpet is one of the easiest flooring upgrades you can make. These peel-and-stick carpet tiles let you cover a floor in an afternoon with nothing more than a utility knife and a clean subfloor, no stretching, tack strips, or pro installer required. They’re not the answer for every room, but understanding where they shine and where they fall short will tell you whether they’re right for your project.
What Stick on Carpet Actually Is
Stick on carpet comes as modular squares, commonly 12 by 12, 18 by 18, or 24 by 24 inches, with a pre-applied adhesive backing or a peel-off adhesive film. You remove a release paper and press each tile to the floor. Some versions use a sticky pad system rather than full glue, and others rely on adhesive tabs that connect tile to tile. Either way, the appeal is the same: a fast, tool-light install that almost anyone can handle.
The Best Uses for Stick on Carpet
Peel-and-stick carpet earns its keep in spaces where convenience, low cost, and easy replacement matter more than plush luxury.
- Basements: Modular tiles add warmth over concrete, and if a leak damages a few squares you replace only those, not the whole floor.
- Rentals: Many tiles lift off without ruining the subfloor, letting renters add comfort and take it with them or remove it at move-out.
- Stairs: Individual tiles or treads cut neatly to fit each step and add grip and sound dampening.
- Home offices, playrooms, and dens: Quick, affordable comfort underfoot.
- High-wear zones: Because you can swap one damaged tile, they suit areas prone to stains or traffic wear.
How to Install Stick on Carpet
The single biggest factor in a lasting install is the surface underneath. The adhesive needs a clean, dry, smooth subfloor to grip.
- Prep the floor. Sweep and vacuum thoroughly, then mop and let it dry completely. Any dust, grease, or moisture will keep tiles from sticking. Fill cracks and sand down high spots so the floor is smooth and flat.
- Check for moisture. On concrete, run a plastic-sheet moisture test first. Adhesive won’t hold on a damp slab.
- Plan your layout. Find the room’s center, snap chalk lines, and dry-lay tiles to avoid thin slivers at the walls. Mind the pile direction arrows on the back for a uniform or deliberate checkerboard look.
- Peel and press. Starting at the center, remove the backing and press each tile firmly, butting edges tightly without gaps. Work outward row by row.
- Cut the borders. Score the back with a sharp utility knife and a straightedge, then snap or cut to fit edges and around obstacles.
- Roll or press the whole floor. Walk it down or use a roller to ensure full adhesion.
How to Remove Stick on Carpet
Removal is usually straightforward, which is a big part of the appeal. Lift a corner and peel the tile up slowly. If the adhesive resists, warming it with a hair dryer softens the glue and helps it release cleanly. Any leftover adhesive residue can be scraped and cleaned with an adhesive remover or warm soapy water. On some surfaces and with stronger adhesives, expect a little residue cleanup; test one tile in a corner first if you’re a renter worried about the subfloor.
The Honest Limits
Stick on carpet is convenient, but it isn’t a substitute for wall-to-wall carpet in every situation. Know the tradeoffs going in.
- Lower-profile feel. Most peel-and-stick tiles have a thinner, firmer pile than padded broadloom carpet, so they’re less plush underfoot.
- Adhesion depends on prep. On dusty, damp, or uneven floors, tiles loosen and edges curl. Surface prep is non-negotiable.
- Seams are visible. You’ll see the grid of tile edges, especially with solid colors; patterned and textured tiles hide seams better.
- Not for very wet areas. Bathrooms and laundry rooms with standing water can defeat the adhesive unless the product is specifically rated for moisture.
- Moderate durability. Great for light to medium traffic; very heavy commercial traffic calls for glued-down commercial carpet tile.
Tips for the Best Results
Buy 10 percent extra so you have replacement tiles that match the dye lot down the road. Let tiles acclimate in the room for 24 hours before installing so they don’t shift as they adjust to temperature. Choose textured or patterned designs to disguise seams and hide dirt. And vacuum regularly with a brush-roll setting suited to low-pile carpet to keep the tiles looking fresh.
Stick on Carpet vs. Other Carpet Tile Options
It helps to know where peel-and-stick fits among carpet choices. Glue-down commercial carpet tiles use a separate adhesive and offer the strongest bond and best durability for heavy traffic, but they’re messier to install and harder to remove. Loose-lay or interlocking carpet tiles sit on the floor without adhesive and rely on weight or connecting edges, which is great for rentals but can shift in high-traffic areas. Peel-and-stick splits the difference: more secure than loose-lay, far easier than glue-down, and removable in most cases. For a DIY basement or office, peel-and-stick is usually the sweet spot; for a busy commercial space, glue-down wins.
Cleaning and Maintenance
Keeping stick on carpet looking good is simple but worth doing regularly. Vacuum at least weekly using a setting suited to low-pile carpet, since aggressive beater bars can lift tile edges over time. Blot spills immediately rather than rubbing, and treat stains with a carpet spot cleaner; one big advantage of tiles is that a permanently stained square can simply be peeled up and swapped for a spare. For a deeper clean, most tiles tolerate light damp cleaning, but avoid soaking them, which can loosen the adhesive. With routine vacuuming and prompt spill cleanup, a peel-and-stick carpet floor stays fresh for years.
The Bottom Line
Used in the right place, stick on carpet is a fast, affordable, and renter-friendly way to add warmth and comfort to basements, offices, stairs, and play spaces. Success comes down to a clean, dry, smooth subfloor and realistic expectations about feel and seams. Prep well, lay it carefully, and you’ll get a comfortable floor you can install in an afternoon and repair one tile at a time.